


70
Others
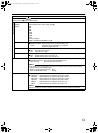
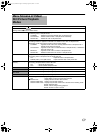
Before sending for repair, check the camcorder’s problem according to the table below.
If the problem persists, consult our authorized dealers or JVC service center.
Troubleshooting
Symptom Action Page
Card
SD card cannot be
inserted.
● Check that the SD card is facing the right direction. 23
Power
Power cannot be switched
on.
● Connect the AC adapter correctly.
● Charge the battery.
19
19
Shooting
Shooting cannot be
performed.
● Use the CAM/MEDIA button to set to the camera shooting mode.
● Check the shooting mode with the video and still picture indicating lamps.
25
25
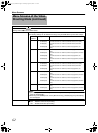
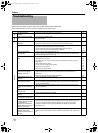
Shooting stops by itself.
● Shooting stops automatically after 12 hours of continuous recording.
● Shooting may stop halfway due to the nature of the card.
Check whether the card is a recommended SD card (Class 6 or higher)
Erase the contents of the SD card (DELETE, FORMAT)
-
7
51, 63
Focus is not adjusted
automatically.
● Clean any dirt or water droplets from the lens.
● If you are shooting at a dark place or shooting a subject that has no contrast between
dark and light, adjust the focus manually.
-
31
The recorded subject is too
dark.
● Use [Lolux].
● Set exposure to the [+] side.
● For videos, set to the manual shooting mode and increase the sensitivity using the
GAIN switch.
● Set the GAIN switch to [AGC].
● For still pictures, set [GAIN UP] to [AUTO].
● Set to open up the aperture.
● Set to lower the shutter speed.
32
33
37
61
68
37
37
The color of the recorded
subject looks unnatural.
(Reddish, bluish, etc.)
● Depending on the lighting conditions or when there are numerous light sources in the
background, set to the manual shooting mode and perform auto white balance
adjustment.
● Adjust the red or blue using white paint adjustment.
35
36
White balance cannot be
adjusted.
● Do not use [TWILIGHT] from Program AE. 32
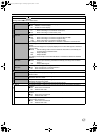
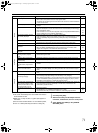
Continuous shooting speed
of still pictures is slow.
● The continuous shooting speed drops if the function is used continuously.
● Continuous shooting speed may drop depending on the S D card in use and or under
certain shooting conditions.
-
-
The actual recording time is
shorter than the estimated
time.
● Recording time may shorten depending on the environment, such as when shooting
fast-moving subjects.
-
Focus knob of the lens
does not work.
● Set the FOCUS/ZOOM switch to FOCUS. 31
Zoom knob of the lens does
not work.
● Set the FOCUS/ZOOM switch to ZOOM. 30
The MIC terminal and built-
in microphone do not work.
● Remove the audio unit cable from the AUDIO IN terminal of the camcorder. 40
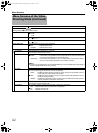
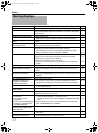
Unable to adjust the
recording level of the built-
in microphone or
microphone connected to
the MIC terminal using the
recording level knob.
● The recording level of the built-in microphone or microphone connected to the MIC
terminal cannot be adjusted using the recording level knob. (The recording level knob
can only be used for the INPUT1/INPUT2 terminal. Set the volume of the built-in
microphone or MIC terminal using the [INTERNAL MIC LEVEL] or [MIC LEVEL
SETTING] menu.)
64
Unable to switch to the
playback mode when
continuous clip recording is
paused.
● When the RREC icon lights up in red or the RW icon lights up in yellow, it is not
possible to switch to the playback mode. To switch to the playback mode, close the clip
file.
28
M9H7_EN_001D.book Page 70 Thursday, August 26, 2010 11:51 AM