


55
8. PLAYBACK MODE
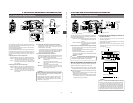
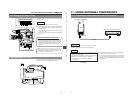
REW button FF button
STOP button PLAY button
LIGHT
ON
OFF
COUNTER
CTL
TC
UB
RESET
OPERATE/WARNING
MONITOR
SELECT
STATUSSHUTTER
MENU
FILTER
1 3200k
2 5600k
3 5600k+ND
POWER
NG
G
A
IN
O
U
T
P
U
T
W
H
T
.B
A
L
V
T
R
ON OFF
ALARM
MONITOR
CH-1
CH-2
AUDIO
LEVEL
AUTO IRIS LOLUX
BACK L
NORMAL
SPOT L
STRETCH
NORMAL
COMPRESS
FULL AUTO BLACK
H
M
L
SA
V
E S
T
B
Y
B
A
RS
CAM
ON
O
F
F
A
U
T
O
K
N
E
E
P
R
S
T
A
B
LOG REW FF
PLAY STILL
STOP
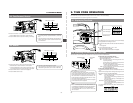
Ⅲ Press the FF button in stop mode to fast forward the tape.
Press the REW button in stop mode to rewind the tape.
Ⅲ Press the STOP button to stop fast forwarding or rewinding.
Ⅲ Press the FF button in play mode to search the tape in the
forward direction at about 10 times the normal speed.
• Press the REW button in play mode to search the tape in
the reverse direction at about 10 times the normal speed.
Ⅲ Press the PLAY button to resume normal playback.
Ⅲ Press the STOP button to stop.
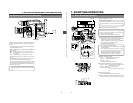
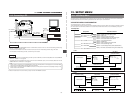
8-2 Fast-Forward, Rewind
8-3 Search
• The audio is reproduced during the search.
• Video noise may be observed or the image may become
unstable during the search, but this is not a malfunction.
• When the tape approaches the end during fast forwarding
or rewinding, the tape speed decelerates to protect the
tape.
• The time required for fast forwarding and rewinding may
become longer when used in a cold environment. This is
not a malfunction.
REW button
FF button
STOP button
LIGHT
ON
OFF
COUNTER
CTL
TC
UB
RESET
OPERATE/WARNING
MONITOR
SELECT
STATUSSHUTTER
MENU
FILTER
1 3200k
2 5600k
3 5600k+ND
POWER
NG
G
A
IN
O
U
T
P
U
T
W
H
T
.B
A
L
V
T
R
ON OFF
ALARM
MONITOR
CH-1
CH-2
AUDIO
LEVEL
AUTO IRIS LOLUX
BACK L
NORMAL
SPOT L
STRETCH
NORMAL
COMPRESS
FULL AUTO BLACK
H
M
L
SAV
E
STBY
B
ARS
CAM
O
N
O
FF
A
U
T
O
K
N
E
E
P
R
S
T
A
B
LOG REW FF
PLAY STILL
STOP
56
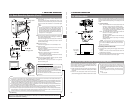
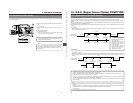
9. TIME CODE OPERATION
TC GENERATOR
FREE
REC
PRESET
REGEN
CH-1
CH-2CH-1
CH-2
CH-1 CH-2
CONTINUE MENU
PRESETADVANCESHIFTHOLD
AUTO
MANUAL
FRONT
REAR
DATA SET
SELECTITEMGROUP
AUDIO SELECT
AUDIO INPUT
AUDIO
LEVEL
LITHIUM BATT.
REC/FREE
switch
PRESET/REGEN
switch
H M S F
NDF
The time code or user's bit data to be recorded onto the tape can be preset to a desired value.
Ⅲ Setting the time code related switches
• Set the PRESET/REGEN switch to "PRESET".
• Set the REC/FREE switch.
REC : The data preset in the time code generator runs
only during recording.
Use this setting if it is required to record continual
time codes across different scenes.
* However, approximately ±1-frame variations may
occur in scene transition accuracy.
FREE: The time code starts to run from the time it is preset
in the time code generator.
Ⅲ Setting the VCR Setup Menu (U-ver only)
• Set the VCR Setup Menu item No. 516 DISPLAY SELECT to
“TC”.
Select the time code generator's framing mode using the VCR
Setup Menu item No. 416 NON DROP/DROP.
DROP : The time code generator's running method is set
to the drop frame mode.
Use this setting when placing emphasis on the
recording time.
The “DF” indicator lights up on the display in the
drop-frame mode.
NON DROP
: The time code generator's running method is set
to the non drop frame mode.
Use this setting when placing emphasis on the
number of frames.
In the NON DROP frame mode, the "NDF" indicator lights on
the display.
U-ver. only
Drop frame/Non-drop frame mode
In the NTSC system, the actual number of frames per 1
second is approximately 29.97 frames, but the number of
frames that becomes the processing reference of the time
code is 30 frames. To compensate for this difference, the
mode called drop mode drops frame 00 and 01 for every
minute that cannot be divided by 10.
The non-drop frame mode is when no frames are dropped
and the actual time shift is neglected.
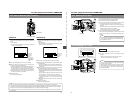
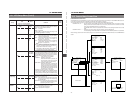
9-2 Presetting and Recording of Time Code
The GY-DV500 records SMPTE-standard time codes for U-ver. or EBU-standard time codes for E-ver. and user's bits. In the play or
the record mode, the reproduced time codes or user's bits are shown on the counter display.
• Time code data cannot be output through the unit's connectors.
The selected time codes can be shown on the counter display
during playback and recording as follows.
Ⅲ Set the VCR Setup Menu item No. 516 DISPLAY SELECT to
“TC”.
☞ See page 69.
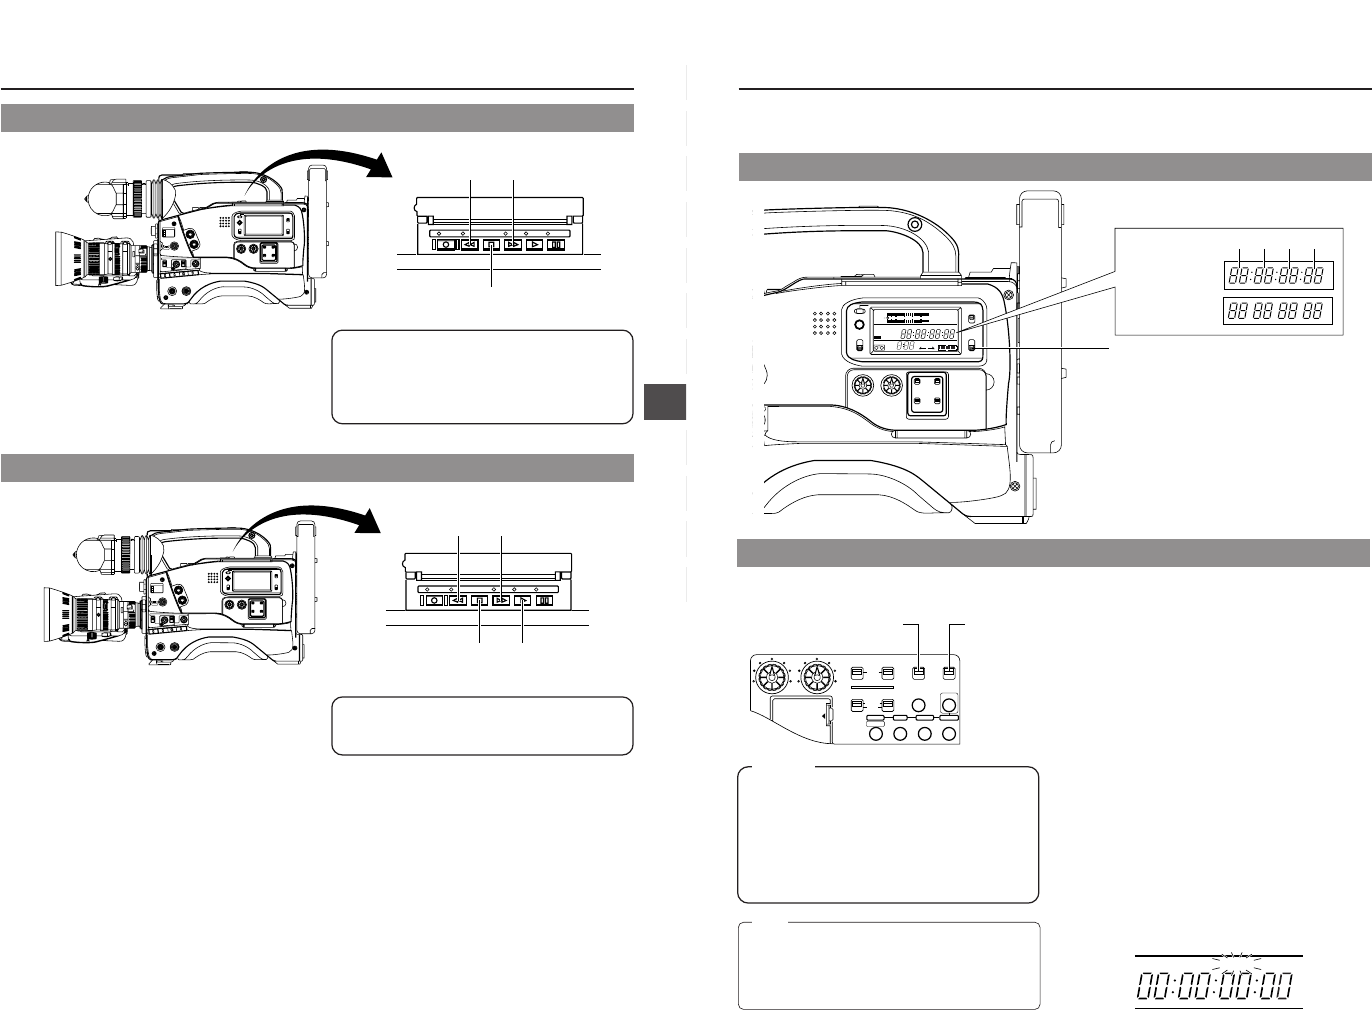
Ⅲ Set the COUNTER switch to "TC" or "UB".
TC: Time codes are displayed.
UB: User's bit data of time codes are displayed.
9-1 Displaying Time Code
Note:
When the VCR Setup Menu item No. 398 SSF MODE is set
to CUE MODE or MARK MODE, the time code generator’s
running method is internally set to the REGEN mode.
If No. 398 SSF MODE is not set to OFF, the time code
cannot be preset.
LIGHT
ON
OFF
COUNTER
CTL
TC
UB
RESET
OPERATE/WARNING
MONITOR
SELECT
T
.B
A
L
F
ALARM
MONITOR
P
R
S
T
CH-1
CH-2
AUDIO
LEVEL
LOLUX
E
REV FWD
FBATT
H
HM
MSF
REMAIN
AUD LOCK
32k
CH 1
CH 2
48k
PB NDF
AUTO OFF DEW
L iRFSERVO
HOLD
SP
MENU
OVER
OVER
40 30 20 10 0
dB
H M S F
COUNTER switch
Time code display
User’s bit display
Hour Min. Sec. Frame