


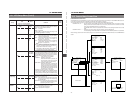
61
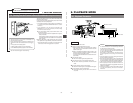
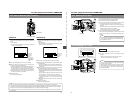
10. S.S.F. (Super Scene Finder) FUNCTION
CUE Mode
1.
Set the S.S.F. mode as CUE mode.
Set the VCR Setup Menu item No. 398 S.S.F. MODE to
"CUE".
☞ See page 69.
• The CUE mode is indicated in the lower part of the Status
1 screen in the viewfinder.
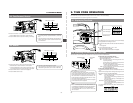
MARK Mode
1.
Set the S.S.F. mode as MARK mode.
Set the VCR Setup Menu item No. 398 S.S.F. MODE to
"MARK".
☞ See page 69.
• The MARK mode is indicated in the lower part of the
Status 1 screen in the viewfinder.
AUTO
WHITE
SKIN
AREA
ACCU
FOCUS
TAKE
VTR
ZEBRA
AUDIO
LEVEL CH-1
ON
OFF
VF
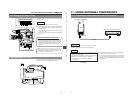
TAKE button
VTR trigger button
2.
Press the VTR trigger button to start the recording.
3.
When you reach the point that you want to memorize as
the CUE point, press the TAKE button.
• The time code data of the point where the TAKE button is
pressed is stored in the unit's memory as CUE data.
The LOG button’s LED lights during memorization of the
CUE point and the “∗” mark is shown in the viewfinder.
Ⅲ Press the TAKE button each time you reach a point that
you want to memorize as CUE data.
4.
Stop the recording.
Press the VTR trigger button.
2.
Press the VTR trigger button to start the recording.
3.
When you reach the scene that you want to memorize, press
the TAKE button.
• The time code data of the point where the TAKE button is
pressed is stored in the unit's memory as the start point
of the scene.
4.
When you reach the scene that you want to memorize as
the ending point, press the TAKE button again.
• The time code data of the point where the TAKE button is
pressed is stored in the unit's memory as the ending point
of the scene.
• The LOG button’s LED lights during memorization of the
IN point and the “∗” mark is shown in the viewfinder.
The LOG button’s LED remains off during memorization
of the OUT point and the “∗” mark is not shown in the
viewfinder.
Ⅲ For each scene that you want to memorize, repeat steps
3.
and
4
.
5.
Stop the recording.
Press the VTR trigger button.
10-2 How to Use the S.S.F. Function
ACCU -FOCUS
G
F
I
F5.6
STBY 4V21.<60
B
SD
CH1 ----+--
CH2 ----+--
C909
ACCU -FOCUS
G
F
I
F5.6
STBY 4V21.<60
B
SD
CH1 ----+--
CH2 ----+--
M909
Number of
memorized
scenes
MARK mode
Note:
• Once the S.S.F. data has been written to a videocassette, it is not possible to record S.S.F. data to the tape again.
• Once a tape with recorded S.S.F. data is rewound but not ejected before playback or recording is performed on it again, the
previous S.S.F. data cannot be automatically erased when S.S.F. data are recorded (when you overwrite the previous image).
Therefore, the S.S.F. data of the overlapped sections will not correspond to the video image.
Furthermore, please note that the time code data may differ from the actual data if recording is started in the CUE mode in
this situation.
Number of
memorized
scenes
* This indicator
is not indicat-
ing the number
of the CUE
point.
CUE mode
62
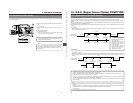
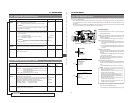
10. S.S.F. (Super Scene Finder) FUNCTION
The S.S.F. data recorded in the unit's memory can be deleted
in the record mode and the record-pause mode.
This function is only valid in the MARK mode.
Ⅲ In the record mode, press the NG button after the IN point
has been stored or after the scene has been stored.
• The S.S.F. data of the cut that you are currently shooting is
deleted.
When the NG button is pressed after the IN point has been
stored, the scene number is not updated.
* The S.S.F. data of previous cuts are not deleted.
Ⅲ In the record-pause mode, press the NG button.
At the point when the TAKE button is used to store the next
scene, the S.S.F. data of the immediately preceding cut is
deleted.
1.
Press the STOP button to enter the stop mode.
2.
Press the RESET button while the LOG button is kept
pressed.
• All the S.S.F. data held in the memory are erased.
However, the reel number is not cleared.
LIGHT
ON
OFF
COUNTER
CTL
TC
UB
RESET
OPERATE/WARNING
MONITOR
SELECT
STATUSSHUTTER
MENU
FILTER
1 3200k
2 5600k
3 5600k+ND
POWER
NG
G
A
IN
O
U
T
P
U
T
W
H
T
.B
A
L
V
TR
ON OFF
ALARM
MONITOR
S
A
V
E
S
T
B
Y
H
M
L
B
A
R
S
C
A
M
A
U
T
O
K
N
E
E
P
R
S
T
A
B
O
N
O
F
F
CH-1
CH-2
AUDIO
LEVEL
AUTO IRIS LOLUX
BACK L
NORMAL
SPOT L
STRETCH
NORMAL
COMPRESS
FULL AUTO BLACK
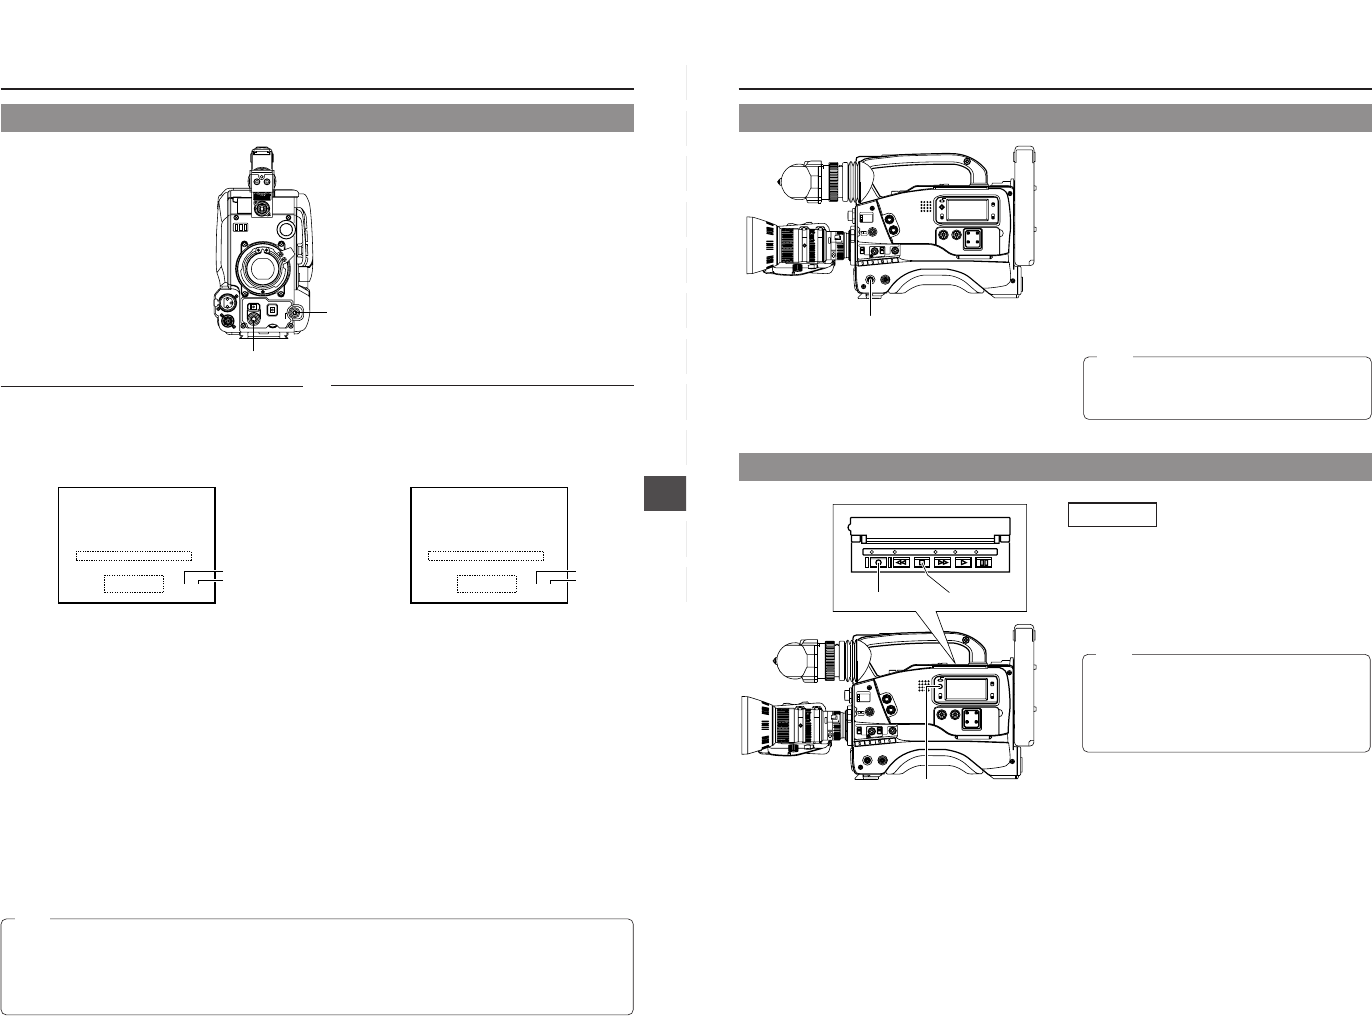
NG button
10-3 Deleting S.S.F. Data
10-4 Resetting S.S.F. Data
Operation
Note:
The unit is not provided with a function for reading out
the S.S.F. data from a tape.
Necessary data should be moved to another device
before resetting. Also, to read out the S.S.F. data from a
tape, please use the optional DV Videocassette
Recorder BR-DV600.
The NG button is only valid for the immediately preceding
scene. The erase of scene data by the NG button cannot
be confirmed on the unit.
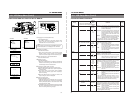
LIGHT
ON
OFF
COUNTER
CTL
TC
UB
RESET
OPERATE/WARNING
MONITOR
SELECT
STATUSSHUTTER
MENU
FILTER
1 3200k
2 5600k
3 5600k+ND
POWER
NG
GAIN
OUTPUT
WHT.BAL
VTR
ON OFF
ALARM
MONITOR
S
A
V
E
S
T
B
Y
H
M
L
B
A
R
S
C
A
M
A
U
T
O
K
N
E
E
P
R
S
T
A
B
O
N
O
F
F
CH-1
CH-2
AUDIO
LEVEL
AUTO IRIS LOLUX
BACK L
NORMAL
SPOT L
STRETCH
NORMAL
COMPRESS
FULL AUTO BLACK
LOG REW FF
PLAY STILL
STOP
2.
LOG button
1.
STOP button
2.
RESET button
Note: