42 C611M-C (3/06)
NOTE: If an X appears rather than a camera icon or clock icon, the NVR300 cannot record from that particular recording source. Refer to the
Troubleshooting section for information.
• The name of the video source is the unit name of the PelcoNet device followed by the camera name. A slash separates the unit name from
the camera name.
NOTE: If the PelcoNet device was not assigned a unit name, the IP address of the PelcoNet device is automatically displayed as the source
name. If the PelcoNet device was not assigned a camera name, a camera name is not displayed.
EDITING A RECORDING
NOTE: Service-level access privileges are required to edit a recording.
You can change (edit) the configuration parameter settings that were programmed for a recording. To change the settings, do the following:
1. Open the NVR-Setup page by clicking the NVR-Setup link for remote access. Use the desktop icon for local access.
The NVR-Setup page appears, displaying the Programmed Recordings dialog box. The dialog box contains a list of recordings that have
been programmed (refer to Figure 28 for a sample list of recordings).
2. In the list of recordings, select the recording whose settings you wish to change.
3. Click the Edit button.
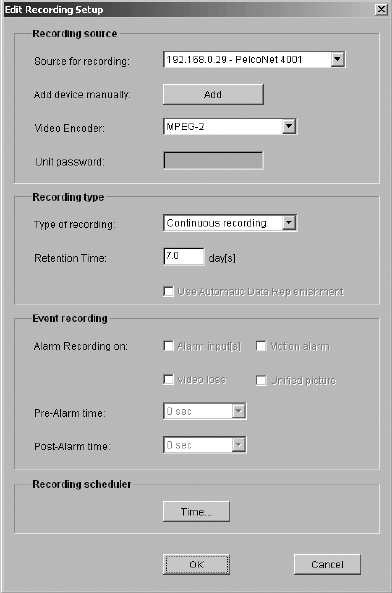
The Edit Recording Setup dialog box appears, displaying the settings that were programmed for the recording (refer to Figure 29).
Figure 29. Sample Edit Recording Setup Dialog Box
4. Change the settings as desired (refer to Table E in the Programming a New Recording section for configuration guidelines).
5. Click the OK button to activate the changes. (Clicking the Cancel button prevents the changes from being activated.)
The Programmed Recordings dialog box reappears and, if applicable, displays changes affecting the camera/clock icon and the Source,
Type of Recording, and Stream Type parameter settings.
