52
Getting Started
2
Attaching a Lens
Attach a proper lens to the camera body.
When you use one of the following lenses with this camera, all the
camera’s capture modes are available.
(a) DA, DA L, D FA, FA J lenses
(b) Lenses with an s (Auto) position; when used in the s position
1
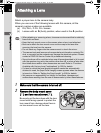
Make sure that the camera is turned off.
2
Remove the body mount cover
(
1
) and lens mount cover (
2
).
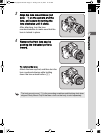
Be sure to put the lens down with the lens
mount side facing upward to protect the
lens mount from damage when there is
no lens mount cover on the lens.
• When attaching or removing a lens, choose an environment that is relatively
free of dirt and dust.
• Keep the body mount cover on the camera when a lens is not attached.
• Be sure to attach the lens mount cover and lens cap to the lens after
removing the lens from the camera.
• Do not insert any fingers into the camera mount or touch the mirror.
• The camera body and lens mount incorporate lens information contacts. Dirt,
dust, or corrosion on the contacts may damage the electrical system. Please
contact a PENTAX Service Center for professional cleaning.
• Some functions will be restricted when one of lenses described in (b) is used
with the aperture ring set to the position other than s, or when a lens other
than listed above and/or other accessories are used. Refer to “Functions
Available with Various Lens Combinations” (p.255) for details.
• If a lens for which the focal length information cannot be automatically
obtained is used, the [Input Focal Length] screen appears when the camera
is turned on. Refer to “Setting the Focal Length” (p.258) for details.
• We assume no responsibility nor liability for accidents, damages and
malfunctions resulting from the use of lenses made by other manufacturers.
e_kb524_84percent.book Page 52 Friday, June 15, 2012 12:13 PM


