


6-4 Chapter 6 Maintenance
6
5 Check each of the following operations, and make sure that the
indicator lights if the corresponding item has been turned on in the
‘!’ LED page.
(1) Set the gain to anything but 0 dB by the GAIN selector and on
the MASTER GAIN page of the setup menu.
(2) Set the SHUTTER selector to ON.
(3) Set the WHITE BAL switch to PRST.
(4) Use the lens extender.
(5) Set the two-part FILTER selector to anything but 1 B.
(6) Press the UP or DOWN button to set the reference value of the
automatic iris adjustment to anything but the standard value.
6 Push the SHUTTER selector from ON to SEL repeatedly, and check
that the shutter setting changes on the viewfinder screen.
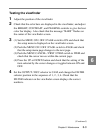
7 Pointing the camera at a suitable subject, focus the camera and
check the picture on the viewfinder screen.
8 (1) Set both of the AUDIO IN switches to FRONT and the AUDIO
IND switch to ON. Check that when sound is input to a
microphone connected to the MIC IN connector on the front of
the camcorder, the audio level indication appears on the
viewfinder screen.
(2) Turn off the AUDIO IND switch, and check that the audio level
indication in the viewfinder disappears.
9 Check that setting the ZEBRA switch to ON and OFF makes the
zebra pattern appear and disappear on the viewfinder screen.
Note
The current display status may inhibit one of the displays or operations
mentioned in steps 3 to 6. If this happens, switch the camcorder to
engineer mode, set the DISPLAY MODE to 3 in the VF DISPLAY page
of the setup menu, then set the desired items in the SHUTTER SPEED,
‘!’ LED, and MENU SELECT pages.