


4-20
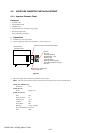
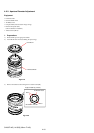
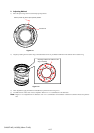
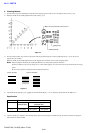
SAL35F14G (1.4/35G) (35mm F1.4G)
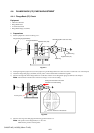
2. Checking Method
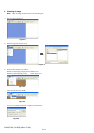
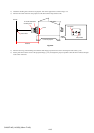
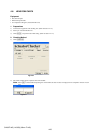
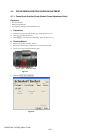
1) Turn the focus ring of the checking lens until the chart image projected on the screen is the sharpest at the center (y’=0).
2) Read the number of the smallest pitched lines at the center (y’= 0).
Fig.4-3-3
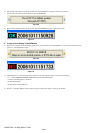
3) Turn the mount rotation ring of lens test projector until the projected image at a certain peripheral point (y’= 15) on the screen
appears the most unsharp.
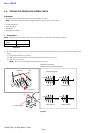
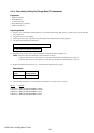
Read the number of the smallest pitched lines (both saggital and meridional: 3 lines) at the peripheral point.
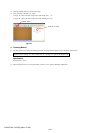
Note: When reading the number of the smallest pitched lines, be careful of the spurious resolution.
Spurious resolution is the reversed image of 2 or 4 lines which appears on screen when focus is beyond maximum revolving
power.
Do not confuse spurious resolution for the smallest pitched lines.
Fig.4-3-4
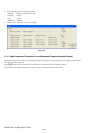
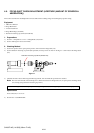
4) Check that the all readings (y’= 0, saggital (S) and meridional (M) at y’= 15) is within the specification of the Table 4-3-2.
Specification
Number of the smallest pitched lines
Distance (m) Center (y’= 0) Peripheral (y’= 15)
(Lines per mm) (Lines per mm)
SM
1.4 125 or greater 50 or greater 40 or greater
Table 4-3-2
5) After the checking is completed, turn the lamp switch of the lens test projector to OFF and cool the inside of the lens test projector,
then turn the fan switch to OFF.
The number represents for lines per mm.
Saggital (S)
Meridional (M)
Correct resolution Spurious resolution
Ver 1.1 2007.02