


4-21
SAL35F14G (1.4/35G) (35mm F1.4G)
4-4. FLANGE BACK (f’F) CHECK/ADJUSTMENT
4-4-1. Flange Back (f’F) Check
Equipment
• 1000 mm Collimator
• Flange Back Tester
• A-mount Attachment
• Flange Back Gauge (43.50mm)
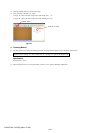
1. Preparations
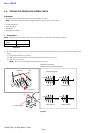
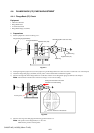
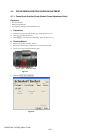
1) Set the equipments as shown in the Fig.4-4-1.
Fig.4-4-1
2)
Looking through the eyepiece lens, turn the eyepiece ring of the flange back tester so that cross line or scale in the view is the sharpest.
3) Attach the flange back gauge (43.50mm) securely to the A-mount attachment and hold them together.
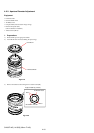
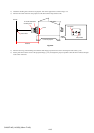
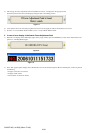
4) Turn the focusing knob of the flange back tester so that fine scratches on the flange back gauge (43.50mm) is the sharpest.
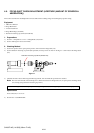
Note: Turn the knob in the direction of the arrow of Fig.4-4-2 for correct reading.
Fig.4-4-2
5) Turn the scale ring of the dial gauge until the long pointer indicates “0”.
Note: This position is the flange back (f’F) = 43.5 mm.
Memorize the position of short-pointer.
flange back gauge (43.50mm)
A-mount attachment
Objective lens (10x)
Dial Gauge (Min. scale: 0.01 mm)
Scale ring
Eyepiece lens (7x)
Eyepiece ring
Focusing knob
Focus on fine lines on the surface.
Always turn the knob in the arrow
direction for correct reading.