


The Administrator Application
26
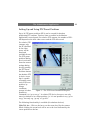
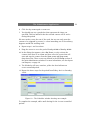
Tilt (Vertical bar) - Click on the bar to set the tilt position for the camera.
When clicking, the tilt level will be set to the level indicated by the cursor
position on the bar.
Pan (Horizontal bar) - Click on the bar to set the pan position for the
camera. When clicking, the pan level will be set to the level indicated by
the cursor position on the bar.
Pan/Tilt buttons - Press the buttons in order to move the camera in the
direction indicated by the button.
Zoom buttons - Press these buttons for extra, digital zoom.
Use Preset Positions from Device - For absolute PTZ cameras you can
choose to use the PP’s on the video server, or the ones defined in AXIS
Camera Recorder. For relative PTZ cameras on Axis video servers, the PP’s
defined PP’s in the server will automatically be used, i.e. the option is
disabled.
Set Position - Press this button when the relative PTZ camera has been
moved to the desired position. This will save the position as the selected
PP. Also used to change the position for an existing preset position to the
current selected camera position. Note that names are truncated if too long
for the preset position buttons in the Monitor application.
Edit Name… - Select a preset position in the list and press this button to
change the name of the preset position.
Test - Move the camera to the selected preset position.
Delete - Remove the selected preset position from the list.
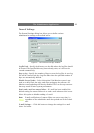
The preset position list is divided into five groups, A, B, C, D and E, each
with 5 preset positions. In the Monitor application, the preset positions
will be shown in these groups of five. Each group has its own button for
fast access in the Monitor.
Use the up and down arrow buttons to change the order of the listed preset
positions, by first selecting a preset and then clicking the arrows.