


The Monitor Application
38
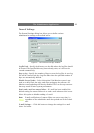
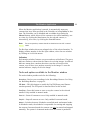
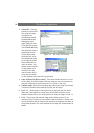
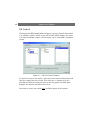
• Create AVI - Press this
button to create an AVI
file, using the images
included in the
period/region defined
by start time to end
time (see previous
page.) Enter the name
of the AVI file to create
in the Create AVI dialog
and optionally include a
timestamp. Once the
file has been named,
the dialog will ask for
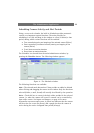
the compression codec
to use. Note that AXIS
Camera Recorder pro-
vides no codecs - only
codecs already installed
on the system will be
available. The codec
used to create the file
must also be available
on the computer where the AVI is played back.
• Zoom In/Zoom Out (Digital zoom) - Press these buttons to zoom in or out
of the image. If you have zoomed into the image you can use the mouse to
drag the image so that the correct part of it is shown in the view.
• Smooth Image - Select this to electronically enhance the image. This feature
is especially valuable when zooming digitally into the image.
• Scale 1:1 - Show images in the original size as retrieved from the device.
Note that if the image size is larger than the available resolution of the
browser window, then it will not be possible to show the image in Scale 1:1.
• Print - Click to print the selected image on the default printer. To use
another printer, first select it as the default. After the button is clicked it will
also be possible to add the name of the operator, the company and notes to
the printed document. The time and date of the image will automatically be
added.
Figure 15 - The Create AVI dialog.
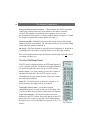
Figure 16 - Examples of codecs