


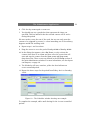
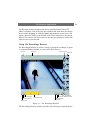

Inputs and Outputs
40
A plus sign (+) will now appear to the left of the device to which the
sensor is connected. Click this to see the defined external event entry. The
event name appears under the device, which indicates that this event is
controlled through that device.
We will now create a timer event, which is tied to the new external event;
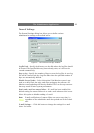
1. Select the external event we created previously by clicking on it in the
Defined Events window. Click the Add New Event button and the New
Timer Event dialog appears.
2. Enter (in seconds or minutes) a value in the field for Timer Event
Occurs After.
3. Give the timer event a name (e.g. Door opens - timer) and click the OK
button to return to the Event Settings dialog.
Now click the plus sign (+) to the left of the external event to see the timer
event entry. The timer event name appears under the external event name,
which indicates that it is controlled by the external event. Click the OK
button to return to the main Administrator window.
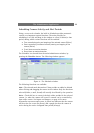
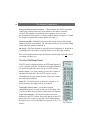
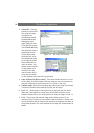
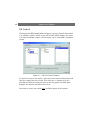
We will now use our events to activate a camera. Click the Scheduler
button and the Camera/Alert Scheduler dialog appears:
1. From the Camera drop-down list, select the camera to be controlled by
the created events.
2. From the Start Event drop-down list, select the event that will start
the camera (Door opens), and from the Stop Event drop-down list
select the event that stops the camera (Door opens - timer).
As the camera can be controlled by events, but also at set times, we must
specify when the camera should be controlled by the start and stop events.
In the Camera/Alert Scheduler dialog box do the following:
3. Set the Mode to Set to specify the event period.
4. Check the Online box and uncheck the E-mail box. Any time periods
added will now only apply to the Online function.
5. In the Scheduler week view, click on the day on which the
event-controlled period starts.