


4-22
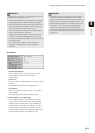
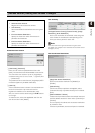
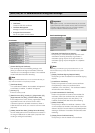
Timer
1 [Timer Event Setting]
Select [Enable] or [Disable] for timer event.
2 [Start Time]
Set the start time of the timer event in 24-hour format.
3 [Repeat Setting]
If [Enable] is selected, timer events will be generated
according to settings in 4 [Repeat Interval], 5
[Repeat Count].
4 [Repeat Interval]
Select [1 sec.] [5 sec.] [10 sec.] [30 sec.] [1 min.] [5
min.] [10 min.] [15 min.] [20 min.] [30 min.] [1 hour] [3
hours] [6 hours] or [12 hours] for the upload and e-mail
notification repeat intervals.
5 [Repeat Count]
Set the repeat count for uploads and e-mail notification
in the range of 1 to 65535.
6 [Upload]
Select the upload operation to be performed. If
[Enable] is selected, upload is performed at the set
intervals. To use this function, the [General Upload]
sub-menu and [HTTP Upload] or [FTP Upload] sub-
menu must also be set from the [Upload] menu
(P. 4-15).
7 [E-mail Notification]
Select the e-mail notification operation to be
performed. If [Enable] is selected, e-mail notification is
performed when a timer event occurs. To use this
function, the [E-mail Notification] sub-menu must also
be set from the [Upload] menu (P. 4-17).
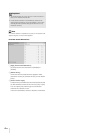
Sound Clip Upload
1 [Browse File]
Specify the audio file you want to register as the sound
clip, and then click [Add].
2 [Sound Clip Name]
Set a name for the audio file to be registered as the
sound clip (up to 15 alphanumeric characters). If a
blank field is applied, the sound clip will be deleted. To
delete a registered audio file, click [Delete] next to the
sound clip name you want to delete.
Note
Audio files must be 20 seconds or shorter and must be “.wav”
files (μ-law PCM 8 bits sampling frequency 8000 Hz, monaural).
Important
[Timer Event Setting] repeats in a 24-hour cycle.
When valid times set by multiple [Timer Event Setting] overlap,
the timer event with the latest [Start Time] setting becomes
effective.
The previously performed timer event stops until its Start Time
on the next day.