


33
E
Recording
• Attach a power source ( 14).
• Load a cassette ( 16).
• Fasten the grip belt ( 13).
• Attach the lens hood ( 12).
• Choose the display: viewfinder ( 12) or LCD screen ( 41).
• Adjust the viewfinder or the LCD screen.
You may also want to install the backup battery ( 136) in order to set the date and time display
( 30). For setting the movie mode, see “Selecting the Movie Mode” ( 48).
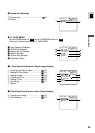
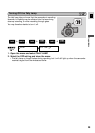
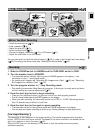
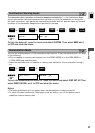
1. Slide the POWER switch to CAMERA and the TAPE/CARD switch to TAPE.
2. Turn the standby lever to STANDBY.
• The camcorder power indicator lights up red and PAUSE appears in the display — the
camcorder is now in “record pause mode”.
•For recording still images, see “Recording Still Images onto a Tape” ( 46) and “Recording
Still Images onto a Memory Card” ( 116).
3. Turn the program selector to [ Easy Recording mode.
• This selects the camcorder’s Easy Recording program. It allows you to simply point and shoot
without making any manual adjustments ( 51).
4. Press the start/stop button to begin recording.
• There are two start/stop buttons, to give you control from both gripping positions.
• The tally lamp flashes rapidly and REC appears in the display.
• When you start recording, the camcorder counts from 0 SEC. to 10 SEC. Recordings shorter
than 10 seconds may be difficult to edit later.
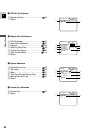
5. Press the start/stop button again to pause recording.
• The camcorder returns to record pause mode and PAUSE reappears in the display.
•You can stop and restart recording as often as you like by pressing the start/stop button.
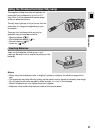
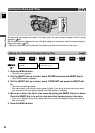
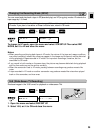
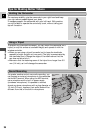
The camcorder is also designed for low-angle recording. The handle is equipped with start/stop
button, PHOTO button and zoom controls. The speed of the zoom controls on the handle can be
set to low, medium or fast in the menu ( 40).
Slide the LOCK lever into the direction of the arrow to lock the handle controls to prevent
accidental operation.
Before You Start Recording
CARD TAPE
LOCK
STANDBY
LOCK
STANDBY
START
STOP
2
3
1
14
Basic Recording
Recording
Low-Angle Recording