


KRAMER: SIMPLE CREATIVE TECHNOLOGY
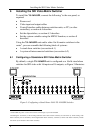
Installing the SDI Video Matrix Switcher
6
6 Installing the SDI Video Matrix Switcher
To install the VS-1616SDI, connect the following
1
to the rear panel, as
required:
Power cord
Video input and output cables
Control Interface cables between switcher units, or PC (or other
controller), as section 6.4 describes
Set the dipswitches, as section 6.3 describes
Set the system variables using the MENU function, as section 8
describes
Using the VS-1616SDI unit and/or other 16x16 matrix switchers in the
series
2
, you can assemble the following kinds of systems:
A stand alone switcher (see section 6.1)
A system of interconnected switchers (see section 6.2)
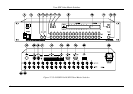
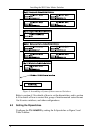
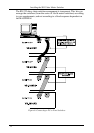
6.1 Configuring a Standalone SDI Video Matrix Switcher
By default, a single VS-1616SDI unit is configured as a 16x16 stand alone
switcher for SDI video with 16 inputs and 16 outputs, as Figure 3 illustrates:
Figure 3: Configuring a Stand Alone 16x16 VS-1616SDI Switcher
1 Switch OFF the power on each device before connecting it to your VS-1616SDI
2 Including the VS-1616A (a 16x16 analog balanced stereo audio matrix switcher), the VS-1616V (a 16x16 analog video
matrix switcher), the VS-1616AD (a 16x16 digital audio matrix switcher), VS-162V (a 16x16 video matrix switcher), and the
VS-162AV (a 16x16 audio-video matrix switcher)