


7
Quick Start Guide
Quick Start Guide
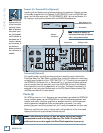
Setup & Configuration
This chapter explains how to set up and configure the HDR24/96 for use in your
studio. Two application examples show how to interface the HDR24/96 with
analog and digital recording consoles.
Required Equipment
Of course, there’s more to a studio than a recorder and some musicians. At a
minimum, you’ll need the following to make the HDR24/96 feel at home:
• 3 Mackie 8-channel I/O (input/output) cards.
• A console with a minimum of 24 tape sends (busses or direct outputs) and
returns (line inputs or monitor returns). If your analog console has only 8
tape sends, use Y-cord splitters to send tape out 1 to HDR24/96 Inputs 1,
9 and 17; tape out 2 to HDR24/96 Inputs 2, 10, and 18, and so forth.
• Cables to connect the HDR24/96 to the console: 3 or 6 multi-channel
snakes or fiber optic cables, depending on your I/O setup.
• All the stuff that typically connects to a console: microphones,
instruments, outboard equipment, control room monitors, and so on.
• Optional, but strongly recommended: an SVGA monitor, two-button PS/2
mouse, and PC keyboard for the Graphical User Interface.
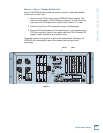
Installation
This section describes how to install the I/O cards and how to connect the
HDR24/96 to your console. Before you begin, you should choose a location for
your HDR24/96 considering the following:
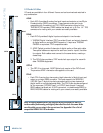
• If you’re not using the GUI interface, Remote 24, or Remote 48 Pro,
position the front panel within convenient reach of your normal recording/
mixing position. If you are using the GUI interface, you might want to get
the HDR24/96 out of the way. Be aware that although analog and AES/
EBU cables can be fairly long, TDIF Optical and Remote 24/Remote 48
Pro cables are limited to about 10 meters. ADAT Optical and KVM
(keyboard, video, mouse) cables can reach up to about 15 meters.
• The HDR24/96 requires a reliable AC power source with a good ground.
Do not use a ground lift adapter or plug the HDR24/96 into an
ungrounded receptacle. Remember, this is a computer. Using an
uninterruptible power supply (UPS) to power the HDR24/96 is a good idea
to avoid an unexpected shutdown and protect it from transient line
voltages.
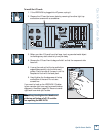
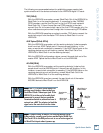
Warning!
Before applying power to the HDR24/96, make sure that the Voltage Selector
switch next to the AC inlet jack on the rear panel is set to the line voltage used
in your region. Powering-on the HDR24/96 with the Voltage Selector switch
set incorrectly will cause an electrical and fire hazard that may result in
irreparable damage to the unit.