


Appendix 129
Appendix
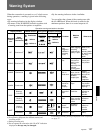
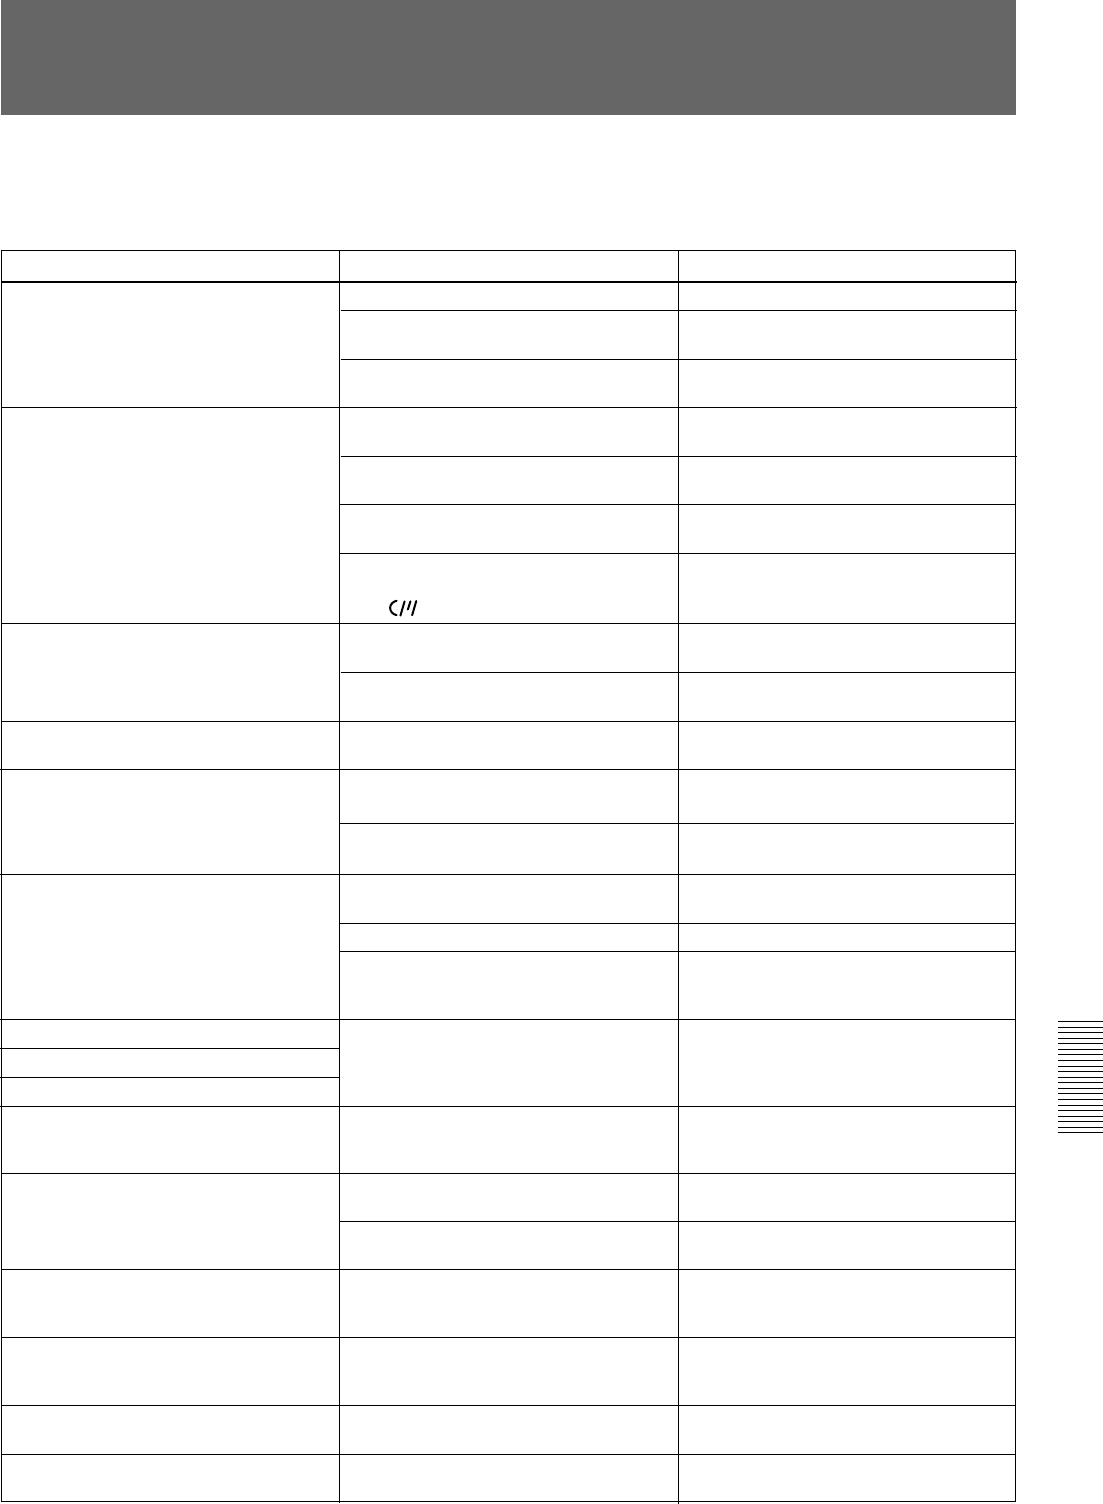
Troubleshooting chart
The indication “Er91-13F” appears in the
display window.
Cause
Troubleshooting
You can use this chart to establish possible causes of
an apparent problem; always double-check before
sending the unit for repair. If a problem persists,
contact your Sony dealer.
Symptoms Remedy
The unit does not power on when you
turn the POWER switch on.
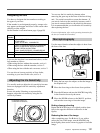
There is no battery pack loaded. Load a battery pack (page 46).
The battery pack has reached the end of
its usable life.
The AC power adaptor is not connected,
or it is not turned on.
Replace the battery pack with a fully
charged one (page 46).
Connect the AC power adaptor or turn it
on (page 48).
The POWER switch of the unit is turned
off.
The tape transport does not operate
when you press either VTR button.
Turn the POWER switch on (page 14).
The unit has reached the end of tape. Rewind the tape, or load a new cassette
(page 53).
The cassette is set record-inhibited. Either load a new cassette, or release
the record-inhibit (page 51).
An incorrect type of DVCAM or DV
cassette is loaded.
(The
indication blinks.)
Load a correct type of DV or DVCAM
cassette (page 51, 53).
The power supply cuts while operating.
The cassette holder is not solidly closed
after the cassette is inserted.
Press on the “PUSH” indication to close
the holder solidly (page 53).
The battery pack is exhausted. Replace the battery pack with a fully
charged one (page 46).
The battery goes dead very quickly. The operating temperature is very low.
The battery pack is inadequately
charged.
Use a BP-L60/L60A or BP-L90/L90A
(page 46).
Recharge the battery pack (page 46).
It is not possible to eject the cassette.
The POWER switch is turned off.
The battery pack is exhausted.
Replace the battery pack with a fully
charged one (page 46).
Press on the “PUSH” indication to close
the holder solidly and then press the
EJECT button (page 53).
The playback sound does not hear.
The video heads are dirty.
The playback picture quality is poor.
The playback picture does not appear.
Clean the video heads using a PDVM-
12CL Cleaning Cassette (page 126).
All controls except the EJECT button are
disabled.
There is condensation on the head
drum.
Remove the cassette, power off, and
wait until the condensation has
evaporated (page 128).
Audio recording is not possible.
Adjust the setting of the AUDIO LEVEL
knob (page 12).
The recorded sound is distorted.
The audio level is too high.
The unit has reached the end of tape. Rewind the tape, or load a new cassette
(page 53).
Adjust the setting of the AUDIO LEVEL
(CH-1/CH-2) knobs, and record again
(page 16).
The recorded sound has a high noise
level.
The audio level is too low.
Adjust the setting of the AUDIO LEVEL
(CH-1/CH-2) knobs, and record again
(page 16).
The unit has failed in loading or saving
the cassette memory data.
Load a new cassette (page 53).
The cassette is automatically ejected.
The tape transport does not operate
when you press any tape transport
button.
Turn the POWER switch on. (page 14)
The cassette holder is not solidly closed
after the cassette is inserted.
Troubleshooting
(Continued)
The AUDIO LEVEL knob on the front is
set to the minimum level.
The AUDIO LEVEL (CH-1/CH-2) knobs
are set to the minimum level.
Adjust the setting of the AUDIO LEVEL
(CH-1/CH-2) knobs (page 16).
An incorrect type of cassette is loaded.
Load a correct type of cassette (page
53).