


213
“Memory Stick” operations “Memory Stick” functies
Markeren van af te
drukken beelden
– PRINT MARK
U kunt aangeven welke van de opgenomen
stilstaande beelden u later wilt afdrukken, door
ze als zodanig te markeren. Dan kunt u later de
gemarkeerde bestanden van de af te drukken
beelden gemakkelijk herkennen.
Uw camcorder volgt de DPOF (Digital Print
Order Format) normen voor de afdrukmarkering
van stilstaande beelden.
Alvorens de camcorder te bedienen
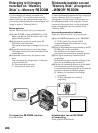
Plaats een “Memory Stick” in de camcorder.
(1)Zet de POWER schakelaar in de “MEMORY”
of “VCR” stand. Zorg dat het LOCK
vergrendelknopje naar rechts (in de vrije
stand) is geschoven.
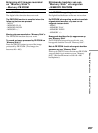
(2)Zorg voor weergave van het stilstaande beeld
dat u voor afdrukken wilt markeren.
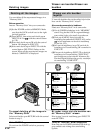
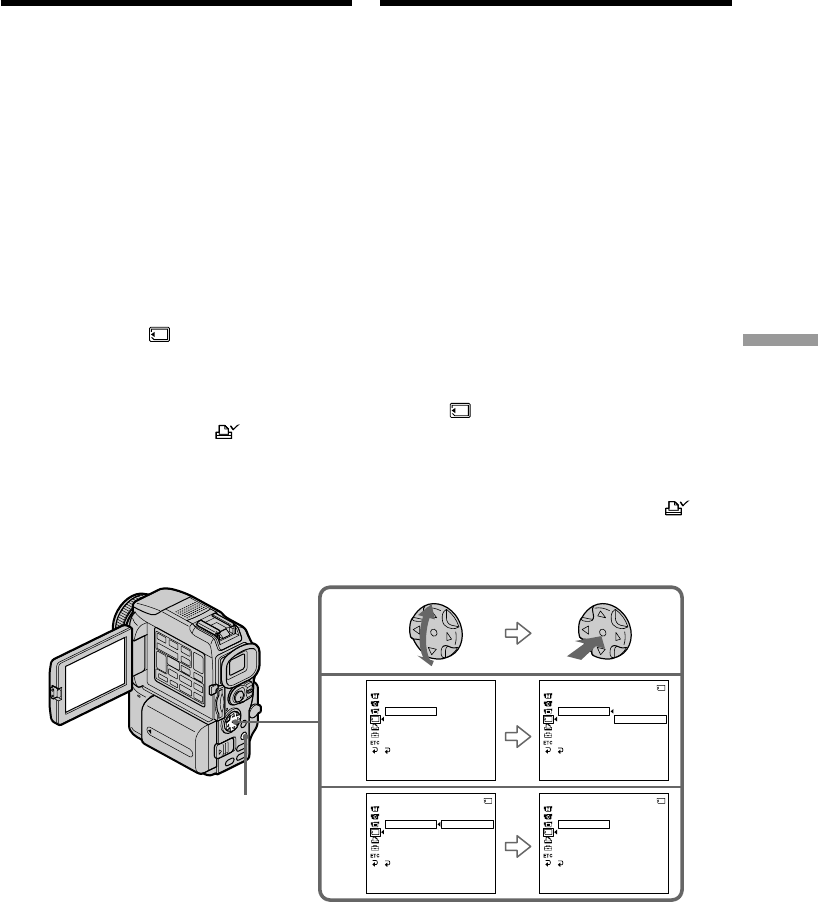
(3)Druk op de MENU toets, kies met de
instelknop het onderdeel PRINT MARK
onder in het instelmenu en druk de
instelknop in (zie blz. 132).
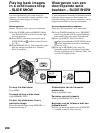
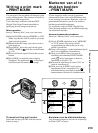
(4)Kies met de instelknop de stand “ON” en
druk de instelknop in.
(5)Druk weer op de MENU toets om het
instelmenu te laten verdwijnen. De “ ”
afdrukmarkering verschijnt nu naast de
bestandsnaam van het af te drukken beeld.
Annuleren van de afdrukmarkering
Volg de aanwijzingen en kies met de instelknop
de stand “OFF” in stap 4.
Writing a print mark
– PRINT MARK
You can specify the recorded still image to print
out by putting marks. This function is useful for
printing out still images later.
Your camcorder conforms with the DPOF
(Digital Print Order Format) standard for
specifying the still images to print out.
Before operation
Insert a “Memory Stick” into your camcorder.
(1)Set the POWER switch to MEMORY or VCR.
Make sure that the LOCK switch is set to the
right (unlock) position.
(2)Playback the still image you want to write a
print mark on.
(3)Press MENU, then select and decide upon
PRINT MARK in with the control button
(p. 132).
(4)Select and decide upon ON with the control
button.
(5)Press MENU to make the menu display
disappear. The print mark is displayed
beside the data file name of the image.
To cancel writing print marks
Select and decide upon OFF with the control
button in step 4.
3
4
MEMORY SET
STILL SET
MOV I E SET
PRINT MARK
PROTECT
SLIDE SHO
W
DELETE ALL
FORMAT
RETURN
[
MENU
]
:
END
MEMORY SET
STILL SET
MOV I E SET
PRINT MARK
PROTECT
SLIDE SHO
W
DELETE ALL
FORMAT
RETURN
[
MENU
]
:
END
10/12
MEMORY SET
STILL SET
MOV I E SET
PRINT MARK
PROTECT
SLIDE SHO
W
ON
OFF
DELETE ALL
FORMAT
RETURN
[
MENU
]
:
END
10/12
MEMORY SET
STILL SET
MOV I E SET
PRINT MARK
PROTECT
SLIDE SHO
W
ON
DELETE ALL
FORMAT
RETURN
[
MENU
]
:
END
10/12
FFO
NO
FFO
MENU