


Recording Audio
78
Adjusting the Audio Level for the XLR Terminals
You can set the audio recording level for audio input from the XLR terminals to automatic or manual
independently for each channel.
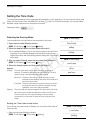
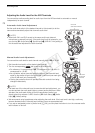
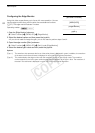
Automatic Audio Level Adjustment
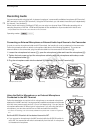
Set the audio level switch of the desired channel to A (automatic) to let the
camcorder automatically adjust that channel’s audio level.
NOTES
• When both CH1 and CH2 are set to the same audio input (external
microphone or external line input), if the audio level is set to automatic, you
can use the [¡ Audio Setup] > [Audio Input] > [XLR ALC Link] setting to
link the audio level adjustment of both channels.
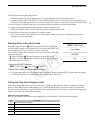
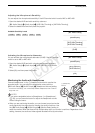
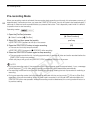
Manual Audio Level Adjustment
You can set the audio level for each channel manually from -G to 18 dB.
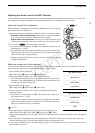
1 Set the audio level switch of the desired channel to M.
2 Turn the corresponding dial to adjust the audio level.
• For reference, 0 corresponds to -G, 5 corresponds to 0 dB, and 10
corresponds to +18 dB.
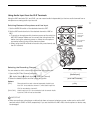
• As a guideline, adjust the audio recording level so that the audio level
meter on the screen will go to the right of the 18 dB mark (one mark right
of the 20 dB mark) only occasionally.
• Closing the protective cover will prevent the audio controls from being
changed inadvertently.
NOTES
• If at least one of the channels is set to manual audio level adjustment, you
can also activate the audio peak limiter to prevent audio distortions. When
activated, the audio peak limiter will limit the amplitude of audio input
signals when they exceed -6 dBFS. Use the [¡ Audio Setup] > [Audio
Input] > [Limiter] setting.
• We recommend using headphones when adjusting the audio level. If the input level is too high, audio may
become distorted even if the audio level indicator shows an appropriate level.
• If you set an assignable button to [Audio Level] (A 89), you can press the button to turn the onscreen audio
level indicator on and off.
CH1/CH2
audio level switches
CH1/CH2
audio level
switches
CH1/CH2
dials
COPY