


93
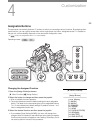
Custom Picture Settings
NOTES
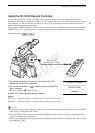
• About changing custom picture related settings using the optional RC-V100 Remote Controller
- If a protected custom picture file or no custom picture file is selected on the camcorder ([- / Select File]
is set to [Off]) custom picture related settings cannot be changed using the remote controller.
- While the remote controller is connected to the camcorder, custom picture files on an SD card ([A1] to [A20]
for SD card A, [B1] to [B20] for SD card B) cannot be used. If you connect the remote controller while a
custom picture file on an SD card was selected, the custom picture file will change automatically to [Off]
(recording without custom picture settings). To use the settings of a custom picture file saved on an SD card,
copy the file in advance from the SD card to an open file slot in the camcorder (A 95).
- Adjusting custom picture related settings using the remote controller will change the settings registered
under the currently selected custom picture file. If you want to keep an important custom picture file, copy it
in advance to an SD card or select in advance a custom picture file you do not mind changing.
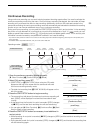
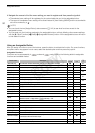
Editing a Custom Picture File’s Settings
This procedure describes how to change the custom picture settings in detail when you want maximum control
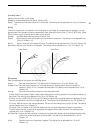
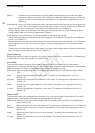
over the image. In addition, the camcorder offers an easier, more intuitive way to adjust only the gamma curve
and white balance settings using a simplified graphical interface (A 101).
1 After selecting a file, select [ / Fine Tuning] and then press the joystick.
2 Select a setting and then press the joystick.
3 Change the setting to the desired level and then press the joystick.
•Refer to Available Custom Picture Settings (A 95) for details on the various settings.
• Repeat steps 2 and 3 for other settings, as necessary.
4 Press the CUSTOM PICTURE button to exit the custom picture menu and apply the new custom
picture settings.
Resetting the current file’s settings to default values
1 After selecting a file, open the [Reset] submenu.
[ / Fine Tuning] > [Reset]
2 Select the desired default values and then press the joystick.
• Select [NEUTRAL] to reset to neutral default values (equivalent to not
using custom picture settings at all) or one of the preset settings ([CINEMA], [Wide DR] or [EOS Std.]) if you
want to replicate these preset settings, for example as a starting point to edit them further.
3 Select [OK] and then press the joystick.
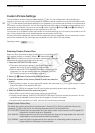
Renaming Custom Picture Files
1 After selecting a file, open the [Rename] submenu.
[ / Fine Tuning] > [Rename]
• A screen appears that displays the current file name with an orange
selection frame on the first character.
2 Push the joystick up/down to select an alphanumeric character or symbol and then press the
joystick to move to the next field.
• Change the rest of the name in the same way.
[ / Fine Tuning]
[Reset]
[ / Fine Tuning]
[Rename]
COPY