


1
2
3
4
5
6
7
8
9
10
11
Cover
Preliminary Notes
and Legal Information
Contents: Basic
Operations
Advanced Guide
Camera Basics
Using GPS
Function
Auto Mode/
Hybrid Auto Mode
Other Shooting
Modes
Tv, Av, and M
Mode
Playback Mode
Wi-Fi Functions
Setting Menu
Accessories
Appendix
Index
Basic Guide
P Mode
118
Still Images
Cropping
Youcanspecifyaportionofanimagetosaveasaseparateimagele.
1 Choose [Cropping].
Press the <n> button, and then
choose [Cropping] on the [1] tab
(=
35).
2 Choose an image.
Press the <q><r> buttons or turn the
<5> dial to choose an image, and then
press the <m> button.
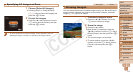
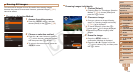
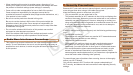
3 Adjust the cropping area.
A frame is displayed around the portion of
the image to be cropped.
The original image is shown in the upper
left, and a preview of the image as
cropped is shown in the lower right.
To resize the frame, move the zoom
lever.
To move the frame, press the
<o><p><q><r> buttons.
To change the frame orientation, press
the <l> button.
Faces detected in the image are
enclosed in gray frames in the upper-left
image. To crop the image based on this
frame, turn the <5> dial to switch to the
other frame.
Press the <m> button.
Preview of Image After Cropping
Cropping Area
Resolution After Cropping
4 Save the new image.
Press the <q><r> buttons or turn the
<5> dial to choose [OK], and then press
the <m> button.
Theimageisnowsavedasanewle.
5 Review the new image.
Press the <n> button. [Display new
image?] is displayed.
Press the <q><r> buttons or turn the
<5> dial to choose [Yes], and then
press the <m> button.
The saved image is now displayed.
•Editing is not possible for images saved as [
] in step 3.
• Images cannot be resized to a higher resolution.
C OPY