


87
1
2
3
4
5
6
8
9
10
Cover
Preliminary Notes and
Legal Information
Contents: Basic
Operations
Camera Basics
Creative Shot
Mode
Auto Mode/
Hybrid Auto Mode
Other Shooting
Modes
Playback Mode
Setting Menu
Accessories
Appendix
Index
Basic Guide
P Mode
7
Advanced Guide
Wi-Fi Functions
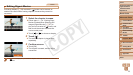
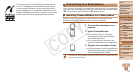
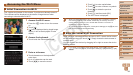
After a connection is established with
the smartphone, the smartphone name
is displayed on the camera. (This screen
will close in about one minute.)
7 Import images.
Use the smartphone to import images
from the camera to the smartphone.
Use the smartphone to end the connection;
the camera will automatically turn off.
•When you are in the vicinity of an access point that you have
previously connected to, the camera will automatically connect to
it in step 3. To change access points, select [Switch Network] from
the screen that will be displayed when the connection is being
established, and follow steps 4 – 6 in “Adding a Computer” (
=
95).
• To control the camera manually, either end the connection from the smartphone
or restart the camera after pressing the power button to turn it off momentarily.
• Once a connection has been established with a smartphone, you can
automatically reconnect to the registered device by simply pressing the <
>
button, even if the camera has been turned off.
• Theimagequalitylevelformoviesthatcanbesentmaydifferdepending
on the smartphone. Refer to the instruction manual provided with your
smartphone for details.
• To remove a registered smartphone, touch [
H
] and then [
n
], and on
the [3]tab,choose[MobileDeviceConnectButton].Aftertheconrmation
message, touch [OK].
• If the date and time have not been set, the [Date/Time] screen will be
displayed in step 2. Set them following the steps in “Setting the Date and
Time” (=
13).
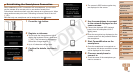
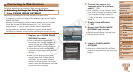
Adding Other Smartphones
Only one smartphone can be assigned to the < > button.
• To assign a different one, clear the current assignment. Touch [H]
and then [n], and on the [3] tab, choose [Mobile Device Connect
Button].Aftertheconrmationmessage,touch[OK],andthenassignthe
new smartphone to the button.
• When registering multiple smartphones, add them to your list of devices
to connect to in the Wi-Fi menu (=
87).
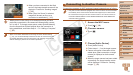
Adding a Smartphone Using the Wi-Fi Menu
You can also add a smartphone by touching [ ] in Playback mode and
then touching [ ], which is displayed in the Wi-Fi menu.
The procedure for adding a smartphone through the Wi-Fi menu varies from
the < > button approach as follows:
• The connection is established through the Wi-Fi menu (=
88). You
cannot connect to a smartphone by pressing the < > button.
• The camera will remain on, even after you have disconnected from the
smartphone.
• You can operate the camera to send images to the smartphone.
• Multiple smartphones can be added.
• After selecting a smartphone in step 6 of “Establishing the Smartphone
Connection” (=
86), the privacy settings screen (where you
decide whether to allow images on the camera to be displayed on the
smartphone) is displayed. If you select [No], images on the camera will
not be displayed on the smartphone.
• To change privacy settings for registered smartphones, choose the
smartphone in [Edit a Device] (=
102), and then choose [View Settings].
• When a connection destination is set using the Touch Actions setting
(=
76), you can automatically access the function to connect to the last
connected destination from the next time by just dragging on the screen
without needing to perform the connection operation.
C OPY