


98
1
2
3
4
5
6
8
9
10
Cover
Preliminary Notes and
Legal Information
Contents: Basic
Operations
Camera Basics
Creative Shot
Mode
Auto Mode/
Hybrid Auto Mode
Other Shooting
Modes
Playback Mode
Setting Menu
Accessories
Appendix
Index
Basic Guide
P Mode
7
Advanced Guide
Wi-Fi Functions
Connecting to a Printer
Connect the camera to a printer via Wi-Fi to print as follows.
When establishing a Wi-Fi connection with a printer, you can either use the
camera as an access point (Camera Access Point mode) or use another
access point.
Follow these instructions when using the camera as an access point. When
using another access point, see “Connecting to Access Points in the List”
(=
96) in “Adding a Computer”.
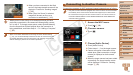
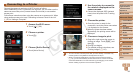
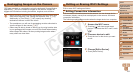
1 Access the Wi-Fi menu.
Touch [ ] (=
88).
2 Choose a printer.
Touch [2].
3 Choose [Add a Device].
Touch [Add a Device].
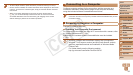
4 Use the printer to connect to
the network displayed on the
camera screen.
Choose the displayed SSID (network
name) from the printer’s Wi-Fi setting
menu.
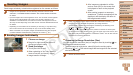
5 Choose the printer.
Once the printer is ready for the
connection, touch the printer name when
it is displayed on the camera.
When the printer has been added
successfully, the printing screen will be
displayed.
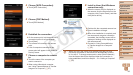
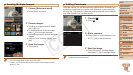
6 Choose an image to print.
Drag left or right across the screen to
choose an image. Touch [
H
] and
then [c].
Printing now begins.
For detailed printing instructions, see
“Printing Images” (=
115).
• You can connect to access points that you have already connected to by
choosing them on the [Select a Device] screen in step 3.
• When a connection destination is set using the Touch Actions setting
(=
76), you can automatically access the function to connect to the last
connected destination from the next time by just dragging on the screen
without needing to perform the connection operation.
C OPY