


95
1
2
3
4
5
6
8
9
10
Cover
Preliminary Notes and
Legal Information
Contents: Basic
Operations
Camera Basics
Creative Shot
Mode
Auto Mode/
Hybrid Auto Mode
Other Shooting
Modes
Playback Mode
Setting Menu
Accessories
Appendix
Index
Basic Guide
P Mode
7
Advanced Guide
Wi-Fi Functions
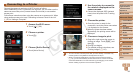
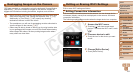
4 Choose [WPS Connection].
Touch [WPS Connection].
5 Choose [PBC Method].
Touch [PBC Method].
6 Establish the connection.
On the access point, hold down the WPS
connection button for a few seconds.
Touch [Next].
The camera will connect to the access
point.
A list of computers connected to the
access point will appear in the [Select a
Device] screen.
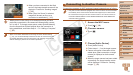
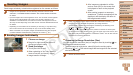
7 Choose a computer to connect
to.
Touch the name of the computer you
want to connect to.
When using a Macintosh computer,
see “Using CameraWindow to Transfer
Images to a Computer” (=
97).
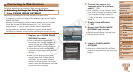
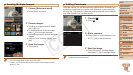
8 Installadriver(rstWindows
connection only).
When the screen at left is displayed on
the camera, click the Start menu on the
computer, click [Control Panel], and then
click [Add a device].
Double click the connected camera icon.
Driver installation will begin.
After driver installation is complete, and
the camera and computer connection
is enabled, the AutoPlay screen will be
displayed. Nothing will be displayed on
the camera screen.
Proceed to “Using CameraWindow
to Transfer Images to a Computer”
(=
97).
•When you are in the vicinity of an access point that you have
previously connected to, the camera will automatically connect
to it in step 3. To change access points, select [Switch Network]
from the screen that will be displayed when the connection is
being established, and follow steps 4 – 5 in “Adding a Computer”
(=
95).
C OPY