


90
1
2
3
4
5
6
8
9
10
Cover
Preliminary Notes and
Legal Information
Contents: Basic
Operations
Camera Basics
Creative Shot
Mode
Auto Mode/
Hybrid Auto Mode
Other Shooting
Modes
Playback Mode
Setting Menu
Accessories
Appendix
Index
Basic Guide
P Mode
7
Advanced Guide
Wi-Fi Functions
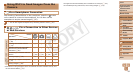
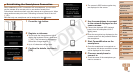
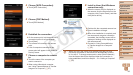
6 Set a Web service you want to
use.
Follow the on-screen instructions to
complete settings for Web services you
want to use.
Once the Web service settings are
complete, click [Finish] at the bottom of
the window to close it.
7 Apply Web service settings to
the camera.
Choose the name of the Web service you
want to set on the camera, and click [
]
in the middle of the lists.
The name of the Web service that will be
saved to the camera will be displayed in
the [Camera] list.
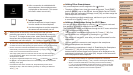
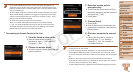
Click [
o
] or [
p
] to change the order of
the Web services that will be displayed in
the camera’s Wi-Fi menu.
Afteryounishadjustingsettingsinthe
[Camera] list to your liking, close the
window.
The settings of Web services and for
transferring images via the server are
applied to the camera.
•AnInternetconnectionisrequiredtoaccessCANONiMAGE
GATEWAY (an Internet browser must be installed on the computer,
you must have an account with an Internet service provider, and an
Internet connection must be established).
•When connecting to CANON iMAGE GATEWAY, check the CANON
iMAGE GATEWAY website for browser (Microsoft Internet Explorer,
etc.) settings, conditions, and version information.
•Separate ISP connection and access point fees may be applicable.
• After logging in to CANON iMAGE GATEWAY the second time in step 5, the
screen in step 7 will be displayed. To change settings for Web services you
use, click [Edit Web Services].
• To add or change Web services, repeat the above procedures starting from step 2.
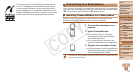
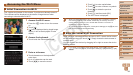
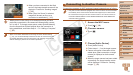
Establishing Web Service Connections
Connect to Web services registered to the camera.
1 Access the Wi-Fi menu.
Touch [ ] (=
88).
2 Choose a Web service.
Touch the icon for the Web service you
want to send images to.
If multiple recipients are available for the
same service, touch the desired recipient
on the [Select Recipient] screen.
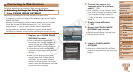
3 Connect to an access point.
With a WPS-compatible access point,
connect to the access point by following
steps 4 – 6 in “Adding a Computer”
(=
95).
With an access point that is not WPS-
compatible, connect to the access point
by following steps 2 – 3 in “Connecting to
Access Points in the List” (=
96).
C OPY