


Printing using advanced color options
Color printing is enabled by default. To optimize print colors for a special print job, use Color Preference and Advanced
Color Options.
For Windows users
1 With a document open, click File > Print.
2
Click Properties, Preferences, Options, or Setup.
3 Navigate to:
Quality tab > Color Extras area
4 Select either Color Preference or Advanced Color Options.
•
If you select Color Preference, then select either Natural or Vivid.
•
If you select Advanced Color Options, then select Use ICC test Chart Process.
5 From the “Ink to Use” area, select either of the following:
•
Color + Black to use four inks including black.
•
Color Only to use cyan, magenta, and yellow inks.
6
Click OK to close any printer software dialogs.
7
Click OK or Print.
For Macintosh users
1
With a document open, choose File > Print.
2
From the printer pop‑up menu, choose your printer.
3
From the print options pop‑up menu, choose Quality & Media > Advanced Options.
4
From the “Ink to Use” pop‑up menu, choose either of the following:
• Color + Black to use four inks including black.
• Color Only to use cyan, magenta, and yellow inks.
5
From the Color Preferences area, choose Natural or Vivid, or choose Use ICC Test Chart Process.
6
Click Print.
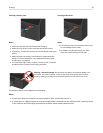
Collating printed copies
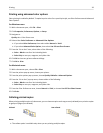
When printing multiple copies of a document, you can choose to print each copy as a set (collated) or to print the copies
as groups of pages (not collated).
Collated Not collated
Notes:
•
The collate option is available only when you are printing multiple copies.
Printing 39