


5 When the scan is finished, save the document.
The file will be converted into a format that can be edited.
6 Open the document in the appropriate application to edit it.
For Macintosh users
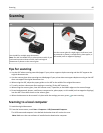
1 Load the original document faceup into the ADF or facedown on the scanner glass.
2
From the Applications folder in the Finder, launch the application you want to use.
Notes:
•
Use any application that supports your printer and lets you work with the OCR software, ABBYY FineReader.
•
If the OCR software is missing, then insert the installation software CD. Reinstall the printer software using
the custom install option so you can manually select all of the packages listed.
3 From the list of devices, select your printer.
Note:
For information on finding the list of devices, check the documentation that came with the application or
search for Scanning an image in the Search field of the Help menu.
4 Adjust the scan settings as needed.
Note:
Use a scan resolution of 300 dpi or more.
If applicable, click on the preview dialog for more information.
5 Set the OCR software as the scan destination, and then start the scan job.
6
If necessary, select the format to which you want to convert the file.
7
Save the file.
Note:
Depending on your settings, the file may open immediately in the appropriate application so you can start
editing.
Scanning directly to e‑mail using the printer software
Make sure you have set up your e‑mail settings before proceeding. For more information, see the section on e‑mailing
in the User’s Guide.
For Windows users
1 Load an original document faceup into the ADF or facedown on the scanner glass.
2
Click or Start.
3 Click All Programs or Programs, and then select the printer program folder from the list.
4 Navigate to:
Printer Home > select your printer > Scan
Scanning 65