


AXIS 2100 User’s Guide Assembling Your Camera
9
Assembling Your Camera
The information provided in this section will help you unpack and assemble your product; you are
then ready to proceed with the installation and configuration of the product into your application
environment, as described in the following sections of this document.
Checking the Hardware Inventory
Unpack and check all the items against the itemized list below. You should contact your dealer
immediately if you find anything is missing or damaged.
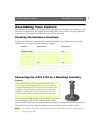
Connecting the AXIS 2100 to a Mounting Assembly
Caution!
The mounting assembly supplied with your AXIS 2100 features
a screw head that attaches to the underside of the product.
Fasten the AXIS 2100 to the mounting assembly and position it appropriately for your application;
three holes in the base unit allow the product to be securely fastened to any wall or ceiling.
Note: If you need to mount your camera upside-down, the AXIS 2100 can be easily configured to flip
images through 180
o
.
Hardware Model Variants Part Numbers
Digital Camera AXIS 2100 0106-001-01
Null Modem Cable - 16954
Mounting Assembly - 15104
Power Supply (PS-D) Europe 14233
UK 14234
Australia 14255
USA 14253
Japan 14254
PS-D Extension Cable 3.3 meter 15187
Printed Materials AXIS 2100 Installation Guide 1.0 17824
AXIS 2100 Warranty 17438
Media AXIS Network Camera CD 1.1 17944
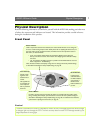
When assembling your camera, please note that the AXIS
2100 is specifically intended for indoor use only, and that the
charged coupled device (CCD) in the camera will become per-
manently damaged if the lens is exposed to too much direct
sunlight or halogen light! The Axis warranty does not cover
CCD damage caused by prolonged exposure to strong light.