


Installing Your Camera on a Network AXIS 2100 User’s Guide
24
Using the AXIS IP Installer
AXIS IP Installer is a Windows 95/98 & NT/2000 program that is ideal for setting the IP addresses
for multiple Axis’ networking products on your network. Also allowing you to conveniently access
the home Web page of any Axis ThinServer device connected to your network, this freely
distributed software is available for download from Axis’ Website at http://www.axis.com/.
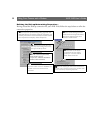
Installing the AXIS IP Installer:
1. Download the latest AXIS IP Installer software onto your desktop and run the
Setup_IPInstaller.exe program to start the installation.
2. The AXIS IP Installer - Setup dialog is displayed on the screen.
3. Follow the instructions as they appear on the screen.
4. Click Finish to complete the installation.
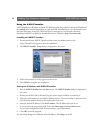
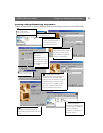
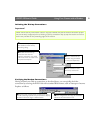
Setting the IP Address with AXIS IP Installer:
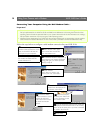
1. Run the AXIS IP Installer from the Start menu. The AXIS IP Installer dialog is displayed on
the screen.
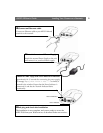
2. Restart your AXIS 2100 by disconnecting the power supply and then reconnecting it.
3. Select the serial number of your AXIS 2100 from the list. The serial number is identical to the
unit’s Ethernet address, found on the underneath of the unit.
4. Enter the desired IP address. Click Set IP address. The IP address will now be set.
5. To access the home page of the AXIS 2100, click Home page of selected Axis-server...
You can now configure the AXIS 2100 according to your requirements.
6. Click OK to exit the program.
For more help during the installation of the IP address, click Help or press F1.