


138
Configuring the system remotely
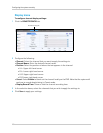
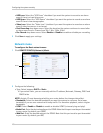
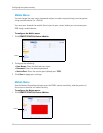
• HDD Loss: Select the "HDD Loss" checkbox if you want the system to record as an alarm
event if there is a hard drive error.
• HDD Space: Select the "HDD Space" checkbox if you want the system to record as an alarm
event if there is low storage space.
• Video Loss: Select the "Video Loss" checkbox if you want the system to record as an alarm
event if video loss occurs in a channel.
• Post Recording drop-down menu: Select the duration the system continues to record after
an alarm even occurs. Choose from 30s, 1 Min, 2 Min, 5 Min.
• Pre-Record drop-down menu: Select Enable or Disable to enable or disable pre-recording.
3 Click Save to apply your settings.
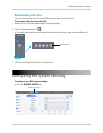
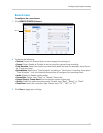
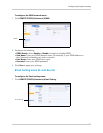
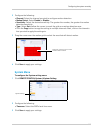
Network menu
To configure the Basic network menu:
1 Cl
ick REMOTE CONFIG>Network>Basic.
2 Co
nfigure the following:
• Type: Select between DH
CP or Static.
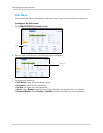
• If you select Static, you can manually edit the IP address, Netmask, Gateway, DNS1 and
DNS2 fields.
NOTE: A s
tatic IP must be assigned within your router before the changes take effect.
• Bandwidth: Sel
ect the desired bandwidth you want the system to consume. Set a lower
bandwidth if you are on a network with heavy traffic. For smoother playback, select a higher
bandwidth.
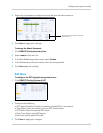
• UPNP: Select Enable or Disable to enable or disable UPNP (universal plug and play).
• Media Port: Enter the desired media port for DDNS. Note that this port must be port forwarded
to your router (by default, port 9000).
• Web Port: Enter the desired web port for DDNS. Note that this port must be port forwarded
to your router (by default, port 80).
Basic