


Saving and Loading Settings
135
Chapter 7 Saving and Loading User Setting Data
To assign names to files
Assigning a name before you save data in an ALL
file can make it easier to distinguish your files.
The following characters can be used in file
names.
Alphanumeric characters (a–z, A–Z, 0–9) and
special characters ( ! # $ % & ' ( ) * + , - . / : ; < =
> ? @ [ \ ] ~)
1 Select FILE >All >File ID in the setup
menu.
2 Turn the MENU knob to select a
character, and then press the MENU
knob.
3 Repeat step 3.
4 When you have finished entering
characters, press the MENU knob to
move the cursor to “SET”, and then
press the MENU knob.
The specified name is displayed.
When you save the file (see page 134), the
data will be saved under this name.
Note
When you load a file from an S×S memory card, the data
saved in the camcorder’s internal memory is overwritten.
See “Basic Setup Menu Operations” (page 91) for
information about menu operations.
1 Select FILE >All in the setup menu.
2 Select All File Load >Execute.
A list box of ALL files appears.
File numbers where “No File” is displayed
are empty file numbers. File numbers with a
file name or a date and time are the number
of files that already contain data.
3 Turn the MENU knob to select the
desired file number.
4 Press the MENU knob.
A confirmation message appears.
5 To execute the load, select [Execute],
and then press the MENU knob.
To cancel the load, select [Cancel], and
then press the MENU knob.
If you choose to execute the load, the
ACCESS lamp lights. The ACCESS lamp
goes out and a completion message appears
when the data has been loaded from the S×S
memory card.
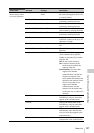
If an error message appears
One of the following error messages may appear
during execution of the load, or as soon as you
select [Execute]. In this case, the file is not loaded
from the S×S memory card.
See “Basic Setup Menu Operations” (page 91) for
information about menu operations.
1 Select FILE >All in the setup menu.
2 Select [All Preset], and then press the
MENU knob.
3 To execute the reset, select [Execute],
and then press the MENU knob.
To cancel the reset, select [Cancel], and
then press the MENU knob.
If you choose to execute the reset, all settings
in the ALL file are reset to preset values.
Error message Problem What to do
NG:Cannot Save No recordable
media is
inserted.
Insert
recordable
media.
NG:Media Full The media is
full.
Use media with
free capacity
remaining.
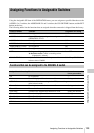
Loading Setting Data
Error message Problem What to do
NG:No Data
• There is no
readable
media
•The specified
file does not
exist on the
media
Insert the
media that
contains the file
you want.
Resetting a File after Changing Its
Contents