


Locations and Functions of Parts and Controls
20
Chapter 1 Overview
a) Of the timecode bits for every frame recorded on the
media, those bits which can be used to record useful
information for the user such as scene number,
shooting place, etc.
For details, see “Setting the Time Data” (page 59).
This button returns to the previous screen when
pressed during thumbnail screen display, expand
thumbnail screen display, or shot mark thumbnail
screen display.
p DISPLAY switch
This cycles the data displayed in the time counter
display in the monochrome LCD panel through
the sequence COUNTER, TC, and U-BIT (see
page 24).
COUNTER: Display the elapsed recording/
playback time (hours, minutes, seconds,
frames).
TC: Display timecode.
U-BIT: Display user bits data.
q BACKLIGHT button
Turns the backlight of the monochrome LCD on
and off. The backlight of the monochrome LCD
panel will be turned on when the camcorder is
powered on for the first time after shipped from
the factory.
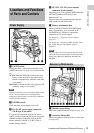
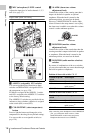
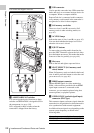
Thumbnail screen operations section and audio
control section
a THUMBNAIL indicator
This lights when thumbnail screen is displayed.
b THUMBNAIL button
Press this button to display the thumbnail screen
(see page 78) and to carry out a thumbnail
operation.
Press once more to return to the original display.
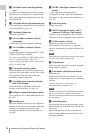
c SET (set) button and arrow buttons
Use these buttons to make timecode and user bit
settings, and for thumbnail screen operations (see
page 83).
When the menu is displayed, press this button to
select an item or to confirm the setting change.
d MENU button
Each press of this button turns the setup menu
display on and off.
The function of this button is the same as that of
the MENU ON/OFF switch.
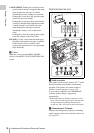
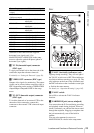
e F-RUN/SET/R-RUN (free run/set/
recording run) switch
Selects the operating mode of the internal
timecode generator. The operating mode is set as
explained below, depending on the position of the
switch.
F-RUN: Timecode keeps advancing, regardless
of whether the camcorder is recording. Use
this setting when synchronizing the timecode
with external timecode.
SET: Sets the timecode or user bits.
R-RUN: Timecode advances only during
recording. Use this setting to have a
consecutive timecode on the recording
media.
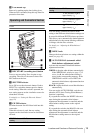
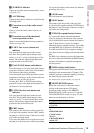
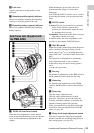
DISPLAY switch:
U-BIT
PRESET/REGEN/
CLOCK switch:
PRESET
F-RUN/SET/R-RUN
switch: SET
User bits data
a)
to 00 00 00
00
Settings of switches To reset