


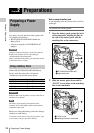

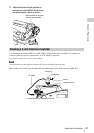
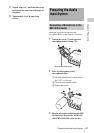

Mounting and Adjusting the Lens
40
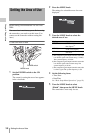
Chapter 2 Preparations
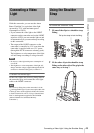
mount securing rubber be put on the lens locking
lever as illustrated above.
If you have attached an aberration correction
lens
The aberration correction function is activated
automatically. Starting the camcorder with an
aberration correction lens may require more time
than normally because of data loading at start-up.
The lens supplied with the PMW-320K is an
aberration correction lens. Contact a Sony service
representative for information about other
aberration correction lenses.
If the lens does not stay in focus properly as you
zoom from telephoto to wide angle, adjust the
flange focal length (the distance from the plane of
the lens mounting flange to the imaging plane).
Make this adjustment just one time after
mounting or changing the lens.
When carrying out the adjustment, use the
supplied flange focal length adjustment chart as
the subject.
Notes
• If you use a subject with insufficient contrast, or move
the camcorder or subject during adjustment, this will
cause an adjustment error.
• Place the subject (the flange focal length adjustment
chart) so that it appears at the center of the screen at the
telephoto end. Arrange so that no nearby object (no
object closer to the camera than the chart) enters the
screen at the wide-angle end.
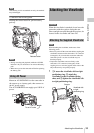
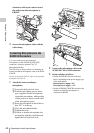
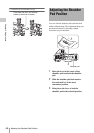
Carrying out the adjustment
When using the auto focus lens
With the lens supplied with the PMW-320K,
zoom and focus operations automatically adjust
the flange focal length.
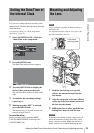
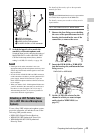
1 Open the iris, position the supplied
flange focal length adjustment chart
approximately 3 meters (10 ft) away
from the camcorder, and arrange the
lighting to obtain a satisfactory video
output.
2 Set the ZOOM switch to SERVO
(power zoom mode).
3 Hold down the flange focal length
adjustment button for 3 seconds.
The flange focal length adjustment starts.
During adjustment
The message “AUTO FB Adjust
EXECUTING” appears on the viewfinder
screen.
If the adjustment completes correctly
The message on the viewfinder screen
changes to “Auto FB Adjust: OK”.
If the flange focal length adjustment does
not complete correctly
Check the subject and lighting conditions,
and repeat the adjustment.
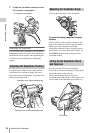
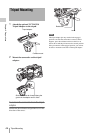
When using a non-auto focus lens
1 Set the iris to manual.
2 Open the iris, position the supplied
flange focal length adjustment chart
approximately 3 meters (10 ft) away
from the camcorder, and arrange the
lighting to obtain a satisfactory video
output.
3 Loosen the fixing screws on the F.f or
F.B ring (flange focal length adjustment
ring).
4 Use manual or power zoom to set the
lens to telephoto.
5 Point the camcorder at the chart by
turning the focus ring and focus on it.
6 Set the zoom ring to wide angle.
7 Turn the F.f or F.B ring until the chart
is in focus, being careful not to disturb
the focus ring.
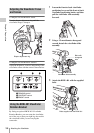
Adjusting the Flange Focal Length
About 3 m (10 ft)