


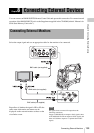


Operating Clips with a Computer
142
Chapter 8 Connecting External Devices
• To guard the PHU-60K/120K/120R against access
from the computer
• To disconnect the PHU-60K/120K/120R’s cable from
the memory card slot or plug again the cable into the
slot
• To turn on the tally indicator on the viewfinder screen
to warn the operator
When you connect a computer to the USB
connector with a USB cable (not supplied), the
message “Connect USB Now?” is displayed to
prompt you to confirm that you wish to enable the
USB connection.
If you select “Cancel” or push the MENU
CANCEL/PRST/ESCAPE down to the ESCAPE
side or if you disconnect the USB cable, the
message “Connect USB Now?” disappears.
If you select “Execute” and press the MENU
knob, the USB connection is enabled and this
camcorder is recognized as an extension drive.
You can carry out the same operations by using
the arrow buttons (J, j, K, k) (see page 20).
If the USB connection is enabled during
recording/playback operation, the operation is
stopped and the message “USB Connecting”
appears on the viewfinder screen.
At this time, the output signal from the VIDEO
OUT connector, HDMI connector, and HD/SD
SDI OUT connector changes to a black signal.
Notes
• The camcorder cannot be operated for recording,
playback, and so on while the message “USB
Connecting” is displayed.
• When the computer accesses the media loaded in the
camcorder, do not try to carry out the following
operations.
- Operating the camcorder (turning the power on/off,
switching the operation mode, etc.)
- Removing or loading a media from an active slot
(being accessed from the computer)
- Removing or connecting the USB cable
Disabling the USB connection
To disable the USB connection, follow the same
procedure as that for removing a device from the
computer.
To enable the USB connection again, first
disconnect the USB cable and then reconnect it.
The message “Connect USB Now?” appears
again.
Note
If you connect the camcorder to the computer using an
i.LINK cable, you cannot use the computer to operate
files stored in a recording media loaded in the memory
card slot of this camcorder.
To remove an S×S memory card
Windows
1. Click on the icon of “Safely Remove
Hardware” on the task bar of the computer.
2. Select “Safely remove S×S Memory Card -
Drive(X:)” from the displayed menu.
3. Check that the Safe To Remove Hardware
message appears then remove the card.
Macintosh
Drag the S×S memory card icon on the desktop to
Trash.
If the S×S memory card icon is located on Finder,
click on the eject icon on its side.
Note
Do not select “Card Power Off” from the S×S memory
card icon displayed on the menu bar.
To use the supplied application software
To copy clips to the local disk of your computer
and perform other management tasks, install the
application software on the supplied CD-ROM.
Install the application software on the supplied
CD-ROM to your computer.
Although the data regarding recorded materials
are stored over multiple files and folders, you can
easily handle the clips without considering such
data and directory structure by using the
application software.
Note
If you operate, e.g. copy the clips on the S×S memory
card by using the Explorer (Windows) or Finder
(Macintosh), the subsidiary data contained by the clips
may not be maintained. To avoid such a problem, use the
application software.