


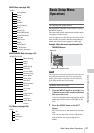

Basic Setup Menu Operations
92
Chapter 6 Menu and Detailed Settings
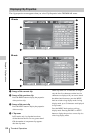
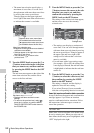
• The menu item selection area displays a
maximum of seven lines. You can scroll
through menus with more than seven lines
by moving the cursor up and down.
Triangles appear at the upper right and
lower right of the menu item selection area
to indicate that a menu is scrollable.
3 Turn the MENU knob, or press the J or
j button, to move the cursor to the item
that you want to set, and then confirm
by pressing the MENU knob or the SET
button.
The sub-items area appears to the right of the
menu item selection area, and the cursor
moves to the first sub-item.
4 Turn the MENU knob, or press the J or
j button, to move the cursor to the sub-
item that you want to set, and then
confirm the selection by pressing the
MENU knob or the SET button.
The settings of the selected sub-item appear,
and the cursor moves to the currently
selected value.
• The settings area displays a maximum of
seven lines. You can scroll through menus
with more than seven sub-items by moving
the cursor up and down. Triangles appear at
the upper right and lower right of the
settings area to indicate that a sub-item
menu is scrollable.
• For sub-items with a large settings range
(for example, –99 to +99), the settings area
is not displayed. Instead, the sub-item name
is highlighted to indicate that the sub-item
can be set.
5 Turn the MENU knob, or press the J or
j button, to select the value to set, and
then confirm by pressing the MENU
knob or the SET button.
The setting is changed, and the display is
updated to show the new setting.
If you select [Execute] for an executable
item, the corresponding function is executed.
Items that require confirmation before execution
In step 3, the menu disappears and a confirmation
message appears if you select an item that
requires confirmation before execution. Follow
the instructions in the message to execute or
cancel the operation.
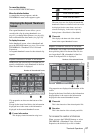
To enter text
Some items, such as time data or file names, must
be set by entering text. When you select one of
these items, the text entry area is highlighted, with
“SET” displayed to the right.
Appears when more menu items
are available below the last line.
(v appears when more menu items
are available above the first line.)
Menu item selection area
•
B appears to the right when more detailed
sub-items are available.
•
Settings appear to the right when a menu
item has no sub-items.
•
You can select to return to the
previous level.
Sub-items area
• Displays sub-items and their current
settings
• To return to the previous level, select ,
press the K button, or push the MENU
CANCEL/PRST/ESCAPE switch down to
the ESCAPE side.
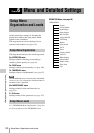
NTSC Area
Settings area