


Setting the Date/Time of the Internal Clock / Mounting and Adjusting the Lens
39
Chapter 2 Preparations
You can set or change the date and time of the
internal clock. The date and time set are reflected
in the timecode.
For menu operations, see “Basic Setup Menu
Operations” (page 91).
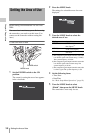
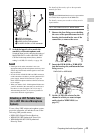
1 Select MAINTENANCE >Clock Set
>Date/Time in the setup menu.
2 Press the MENU knob.
The Date/Time setting window appears.
3 Turn the MENU knob to display the
desired value, and press the knob.
The selection shifts to the next item on the
right.
4 To continue the remaining settings,
repeat step 3.
5 Making sure that “SET” is selected,
press the MENU knob.
The internal clock is set with the date and
time set in steps 3 and 4.
To cancel the setting
Before executing step 5, push the MENU
CANCEL/PRST/ESCAPE switch up to the
CANCEL/PRST side.
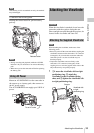
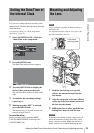
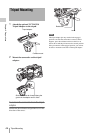
Note
Always power the camcorder off before mounting or
removing a lens.
For information about using the lens, refer to the
operation manual for the lens.
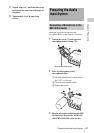
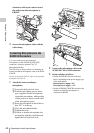
1 Push the lens locking lever up and
remove the lens mount cap from the
lens mount.
2 Align the center pin on the lens with the
center slot in the lens mount, and insert
the lens into the mount.
3 Holding the lens in place, push the lens
locking lever down to lock the lens.
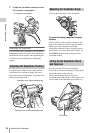
Caution
If the lens is not firmly locked, it may come off
while the camcorder is being used. This could
cause a serious accident. Make sure the lens is
firmly locked. It is recommended that the lens
Setting the Date/Time of
the Internal Clock
Mounting and Adjusting
the Lens
Lens mount
securing rubber