


Advanced Operations
73
Chapter 4 Shooting
• If power is lost because the battery was
removed, the DC cable was disconnected, or the
power was turned off on the AC adaptor side,
then the video and audio data stored in memory
is lost. The data stored in memory is not
recorded. Be careful to avoid this when
exchanging the battery.
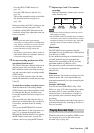
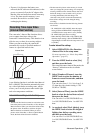
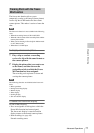
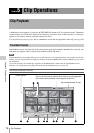
The camcorder’s Interval Rec function allows
you to capture time-lapse video to the
camcorder’s internal memory. This function is an
effective way to shoot slow-moving subjects.
When you start recording, the camcorder
automatically records a specified number of
frames at a specified interval time.
A pre-lighting function is available when Interval
Rec is enabled. This function automatically turns
on a video light before recording starts, which
allows you to record pictures under stable light
and color temperature conditions.
Interval Rec settings and shooting
Notes
• The Interval Rec function cannot be used at the same
time as the picture cache, Frame Rec, or Slow & Quick
Motion function. When you select Interval Rec mode,
the picture cache, Frame Rec, and Slow & Quick
Motion functions are disabled. When you select
picture cache, Frame Rec, or Slow & Quick Motion
mode, the Interval Rec function is disabled.
• The data stored in picture cache memory is cleared
when you change the system settings, for example by
selecting a different video format. Picture data from
before the change is not recorded even if you start
recording immediately after the change. The
camcorder exits picture cache mode automatically.
• Interval Rec settings cannot be changed during
recording.
• Interval Rec is disabled when the following formats
are selected.
- SP 1440/59.94i or SP 1440/50i, when the output
setting is HD and OPERATION >Input/Output
>i.LINK I/O in the setup menu is set to [Enable]
- SP 1440/23.98P (pull-down recording)
- Other than HQ 1920/23.98P or HQ 1280/23.98P,
when the output setting is SD and OPERATION
>Input/Output >i.LINK I/O in the setup menu is set
to [Enable]
To make Interval Rec settings
1 Select OPERATION >Rec Function
>Interval Rec in the setup menu.
For menu operations, see “Basic Setup Menu
Operations” (page 91).
2 Turn the MENU knob to select [On],
and then press the knob.
The camcorder enters Interval Rec mode, the
“Interval” indication on the viewfinder
screen flashes.
3 Select [Number of Frames], turn the
MENU knob to select the number of
frames to record in one take, and then
press the knob.
You can select from 1, 3, 6, 9 (or from 2, 6,
12 when the video format setting is 720/
59.94P or 720/50P).
4 Select [Interval Time], turn the MENU
knob to select the desired interval, and
then press the knob.
You can select 1 to 10/15/20/30/40/50 sec,
1 to 10/15/20/30/40/50 min, 1 to 4/6/12/24
hour.
5 As required, select [Pre-Lighting], turn
the MENU knob to select the length of
lighting time before recording starts,
and then press the knob.
You can select 1 to 10/15/20/30/40/50 sec,
1 to 10/15/20/30/40/50 min, 1 to 4/6/12/24
hour.
Recording Time-lapse Video
(Interval Rec Function)
Interval time
Number of frames in one take