


Locations and Functions of Parts and Controls
26
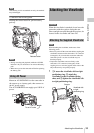
Chapter 1 Overview
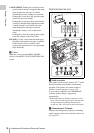
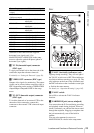
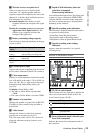
h Zoom control connector (8-pin)
Connecting an optional zoom servo controller
allows remote control of zooming.
i ZOOM switch
SERVO: Motorized zoom. Operate the zoom
with the power zoom lever.
MANU. (manual): Manual zoom. Operate the
zoom with the zoom ring.
j PUSH AUTO button
When the IRIS switch is in the M position for
manual adjustment, press this button for an
instantaneous auto adjustment.
The iris is automatically adjusted while the button
is held down.
k IRIS switch
A (auto): The iris is adjusted automatically.
M (manual): Adjust the iris with the iris ring.
l Power zoom lever
This is enabled when the ZOOM switch is in the
SERVO position. Press the W end for wide-angle
and the T end for telephoto.
Press the lever harder for a faster zoom action.
Notes on auto focus
• In the following cases, it may be difficult to
focus on the subject. If this does happen, use
manual focusing.
- If the subject has no contrast
- If the subject is moving rapidly
- When shooting point light sources, under
street lighting or at night
- When there are very bright objects close to the
subject
- When shooting through a glass window
• If there are a number of objects within the
screen at close and far range, the focus may not
be on the intended subject. In this case, with the
subject on which you want to focus in the center
of the screen, press the PUSH AF button.
• After focusing with the PUSH AF button, if you
operate the zoom or adjust the iris, the depth of
field may become shallower, losing crisp focus.
In such cases, press the PUSH AF button once
more.
• If you focus at wide-angle then zoom to
telephoto, the subject may no longer be in focus.
• It may take time until the image is in focus
while using the slow shutter mode.
Note on zoom speed
Depending on the shooting distance, the zoom
speed may fall as the lens approaches the
telephoto end.
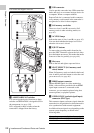
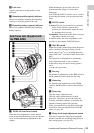
m RET (return video) button
You can use this as an assignable switch (see
page 132).
Use this to check the video when Lens RET is
assigned to this button (factory default setting). If
you press this during recording pause, the last few
seconds recorded appear on the viewfinder screen
(recording review) (see page 69).
Pressing this button (single click) during
recording or playback records a Shot Mark 1
mark, and double-clicking records a Shot Mark 2
mark (see page 71).
n VTR button
Use this to start and stop recording. Press once to
start recording, then press once more to stop.
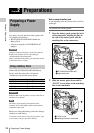
a Plug
Connect to the VF connector (rectangular) on the
camcorder.
Viewfinder