


98
Step 1: Connecting to the VCR
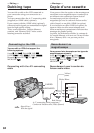
You can connect either the A/V connecting cable
or the i.LINK cable.
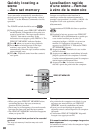
Connect the devices as illustrated on page 94.
Step 2: Setting the VCR to
operate
To connect using the A/V connecting cable, send
the control signal by infrared rays to the remote
sensor on the VCR.
The POWER switch should be set to .
Operate by touching the panel.
(1) Turn the power of the connected VCR on.
If the VCR has an input selector, set it to
input mode.
When you connect a video camera recorder,
set its power switch to VCR/VTR.
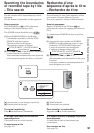
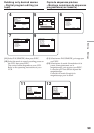
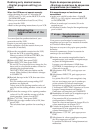
(2) Press FN to display PAGE1.
(3) Press MENU to display the menu.
(4) Select VIDEO EDIT in , then press EXEC
(p. 224).
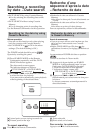
(5) Select TAPE, then press EXEC.
(6) Press EDIT SET.
(7) Select CONTROL, then press EXEC.
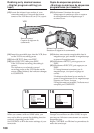
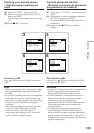
(8) When connecting with the A/V connecting
cable, select IR, then press EXEC.
When connecting with the i.LINK cable,
select i.LINK, press EXEC, then go to
“Step 3: Adjusting the synchronisation of the
VCR” on page 102.
(9) Select IR SETUP, then press EXEC.
(10) Select the IR SETUP code of your VCR, then
press EXEC. Check the code in “About the
IR SETUP code” (p. 101).
Dubbing only desired scenes
– Digital program editing (on
tape)
1
e
étape : Raccordement au
magnétoscope
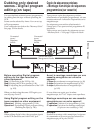
Vous pouvez raccorder le caméscope au
magnétoscope avec le cordon de liaison
audio/vidéo ou un câble i.LINK.
Raccordez les appareils comme indiqué à la
page 94.
2
e
étape : Préparation du
magnétoscope
Lorsque les deux appareils sont reliés par le
cordon de liaison audio/vidéo, envoyez les
signaux de commande infrarouges au capteur de
télécommande du magnétoscope.
Le commutateur POWER doit être en position
.
Utilisez les touches de l’écran tactile.
(1) Allumez le magnétoscope raccordé.
Si le magnétoscope a un sélecteur d’entrée,
réglez-le sur le mode d’entrée.
Si vous raccordez un autre caméscope,
réglez le commutateur d’alimentation sur
VCR/VTR.
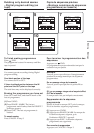
(2) Appuyez sur FN pour afficher la PAGE1.
(3) Appuyez sur MENU pour afficher le menu.
(4) Sélectionnez VIDEO EDIT dans , puis
appuyez sur EXEC (p. 234).
(5) Sélectionnez TAPE, puis appuyez sur EXEC.
(6) Appuyez sur EDIT SET.
(7) Sélectionnez CONTROL, puis appuyez sur
EXEC.
(8) Si vous raccordez un cordon de liaison
audio/vidéo, sélectionnez IR puis appuyez
sur EXEC.
Si vous raccordez un câble i.LINK,
sélectionnez i.LINK, appuyez sur EXEC,
puis passez à la « 3
e
étape : Synchronisation
du magnétoscope » page 102.
(9) Sélectionnez IR SETUP, puis appuyez sur
EXEC.
(10) Sélectionnez le code IR SETUP de votre
magnétoscope, puis appuyez sur EXEC.
Vérifiez le code dans « Codes IR SETUP »
(p. 101).
Copie de séquences précises
– Montage numérique de séquences
programmées (sur cassette)