


Setting the Bluetooth Functions
59
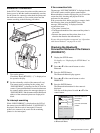
Removing a Printer
1
Display the SETUP menu.
For details, see “Displaying the SETUP Menu” on
page 28.
2
Press v or V of the control button to select
Bluetooth.
3
Press the ENTER button.
The Bluetooth Menu display appears.
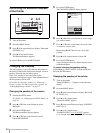
4
Press v or V of the control button to select
REMOVE PRINTER.
The REMOVE PRINTER display appears.
5
Press v or V of the control button to select a printer
to be removed.
6
Press b or B of the control button to select
REMOVE.
7
Press the ENTER button.
The printer selected in Step 5 is removed, and its
printer name and Bluetooth address are deleted.
8
Press the ENTER button again.
The display returns to Bluetooth Menu.
To cancel removing the printer
In Step 6, select CANCEL instead of REMOVE, then
Press the ENTER button. Deletion of the printer is
canceled, and the display returns to Bluetooth Menu.
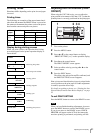
Operation with Several Printers
In a system using several printers, the basic operations
are the same as when one printer is used. If the camera
is turned on after a printer is turned on, the camera
automatically searches for registered printers. The
names and Bluetooth addresses of all printers with
which connection has been established are displayed in
black. Those of any printers with which connection has
failed are displayed in gray.
Printers to be used can be selected with the PRINTER
button. When a connected printer is selected, the print
conditions of the selected printer are displayed in white
on the LCD. If a printer that is not connected is selected,
an alarm will be displayed in yellow.
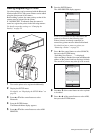
To establish a connection with a currently disconnected
printer, first check that the printer is turned on, and that
the Bluetooth lamp is lit. In addition, press the
PRINTER button on the camera, and make sure that the
name of the printer to be connected is displayed in
yellow. Then, press the PRINT button.
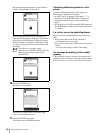
“Reconnecting. . .” is displayed, and the process of
reconnection starts. When reconnection has been
established, in CAMERA mode, the camera returns to
the normal recording mode. In PLAY or Auto Review
mode, the Print Preview display is displayed.
To start printing, press the PRINT button again.
Transmission of image data starts.
If printing is not required, press the MENU button to
terminate the Print Preview display.
Note
When using the print queue function in a multi-printer
system, images will only be printed from one printer.