


Setting System Options LukWerks User Guide
32
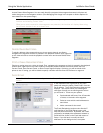
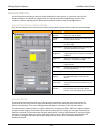
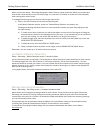
When you have the Setup > Recording dialog open, Werks enters a special mode that allows you to select and
draw motion zones directly on the Live Video image. You must be in Live Mode to access the full functionality
when working with motion zones.
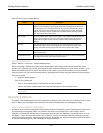
To manage detection zones for a camera, follow these instructions:
1) Click on the SETUP button and choose the Recording tab.
In the Motion Detection section, check the “Enable Motion Detection for camera” box.
Creating and deleting individual zones now is an interaction between the open setup dialog and the
live video window.
a) To create a new zone, hold down your left-mouse button on one corner of the region and drag the
mouse across the screen to the opposite corner of the zone. (If you decide that you do not like the
zone you are creating, you can hit the ESC key before you let go of the mouse.)
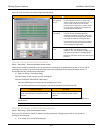
b) To delete a single zone, left-click anywhere in the zone and then press the Delete key or click the
CLEAR SELECTED ZONE button.
c) To delete all zones, click the CLEAR ALL ZONES button.
d) Finally, to detect motion anywhere on the image, click the ENABLE ENTIRE IMAGE button.
Remember, you can create up to 16 motion zones per camera.
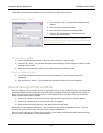
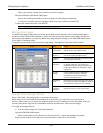
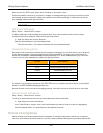
Set Motion Detection Sensitivity
Setup > Recording > Motion Detection section > Sensitivity Slider.
Use the Sensitivity slider on the Setup > Recording tab to adjust the level of motion sensitivity for each camera.
The setting ranges from 0 to 100 sensitive, or low to high sensitivity. 100 is the most sensitivity. You can
adjust the sensitivity to meet your needs. A very low number will tell the camera to only detect motion by large
objects (a person or car). A high number will increase the sensitivity allowing you to capture small objects like
pets or even a passing cloud.
In our graphic below, the motion detection sensitivity level is set to 50.
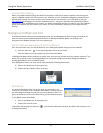
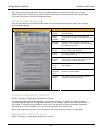
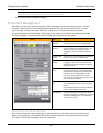
Manage Recording Schedules
Setup > Recording > Recording section > SCHEDULE RECORDING TIME.
Werks allows you to schedule recording events for each camera. These events have two types: Continuous
Recording and camera Off. During Continuous recording schedules, Werks records video from the selected
camera even when there is no motion. Off schedules disable both Motion and Continuous recording, although
you can still monitor the live video.
During times that are not scheduled, Werks by default will record Motion unless you have disabled motion
recording (See Enable & Disable Motion Detection Functionality for more details.)
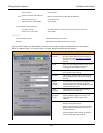
To activate the Recording Schedule dialog, click the SCHEDULE RECORDING TIME button on the Setup >
Recording tab.