


DEFINITY Enterprise Communication Server Release 9
Getting Started with the Avaya R300 Remote Office Communicator
Issue 1
November 2000
Avaya R300 Installation and Upgrade
34Installing the Avaya R300
3
Installation process
The following steps describe the process for installing the hardware into a rack:
■ Unpack and inspect equipment
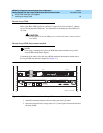
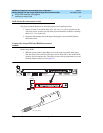
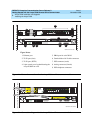
■ Mount the Avaya R300
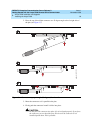
■ Mount the R300 Interconnect module
■ Interconnect the Avaya R300 and Interconnect module
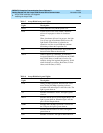
■ Connect DCP and analog telephones, Ethernet, T1 lines, to the Avaya R300 and
R300 Interconnect module
■ Administer on DEFINITY system
■ Administer on the Avaya R300
Unpack and inspect equipment
Check the order and the packing lists to confirm that the following equipment is present. If
any equipment is missing, report this to your Avaya representative.
The Avaya R300 package:
■ Power cord (ensure the cord is correct for the country of installation)
■ DB9-DB9 serial cable
■ 15-ft (x-m) Y cable (Comcode #84522991)
■ 25-to-9 pin adapter
■ Mounting brackets
■ Avaya R300
— combo blade - preinstalled and preconfigured for the Avaya R300
— DSP30 or DSP16 card - preinstalled and preconfigured for the Avaya R300
■ MAX 3000 Installation and Basic Configuration Guide book
■ Getting Started with the Avaya R300 Remote Office book (this book)
■ Avaya DEFINITY Release 9 documentation CD
The Avaya R300 Interconnect module:
■ Power cord (ensure the cord is correct for the country of installation)
■ Mounting brackets (come installed)
■ Avaya R300 Interconnect module
■ Rubber Feet (packed in plastic)