


DEFINITY Enterprise Communication Server Release 9
Getting Started with the Avaya R300 Remote Office Communicator
Issue 1
November 2000
Avaya R300 Administration
86Saving and restoring profiles
5
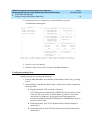
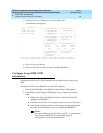
To save your configuration, proceed as follows:
1. Verify that the Download permission is enabled in the active Security profile.
2. Verify that the Term Rate parameter in the System profile is set to 9600.
3. Verify that the terminal-emulation program has a disk-capture feature and an
autotype feature, and that is data rate is set to 9600 bps or lower.
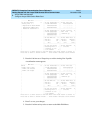
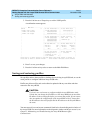
4. Connect the backup device to the Avaya R300 unit’s control port.
5. Turn on the autotype function on your emulator, and start the save process by
pressing any key on the emulator.
6. Highlight Save Cfg and press
Enter.
7. Verify that configuration data is being echoed to the terminal-emulation screen and
that the captured data is being written to a file on the disk.
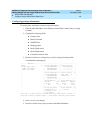
8. The save process is complete when the message Download
complete--type any key to return to menu appears on the
emulator’s display. The backup file is an ASCII file.
9. Turn off the autotype feature.
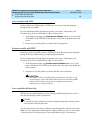
Restore a profile with Restore Cfg
The Restore Cfg command restores a Avaya R300 configuration that was saved with the
Save Cfg parameter, or transfers the profiles to another Avaya R300. Because the Save
Cfg command does not save passwords, the Restore Cfg command does not restore them.
You must enter all save and restore commands from the diagnostic window of the Avaya
R300. For more information on the diagnostic window and how to access it, see Chapter
5, Maintaining and Troubleshooting the Avaya R300 Remote Office Communicator.
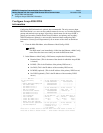
Follow these instructions to restore your configuration from backup, proceed as follows:
1. Verify that the Upload and Edit Security permissions are enabled in the active
Security profile.
2. Verify that the Term Rate parameter in the System profile is set to 9600.
3. Verify that your terminal-emulation program has a disk-capture feature and an
autotype feature, and that its data rate is set to 9600 bps.
4. Connect the backup device to the Avaya R300 unit’s control port.
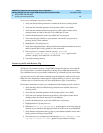
5. Highlight Restore Cfg and press
Enter.
6. When the Waiting for upload data prompt appears, turn on the autotype
function on your emulator and supply the filename of the saved Avaya R300 data.
7. Verify that the configuration data is going to your terminal-emulation screen and is
being restored to the target Avaya R300.
8. The restore process is complete when the message Upload complete--type
any key to return to menu appears on your emulator’s display.