


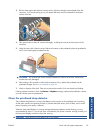


To print the Image Diagnostics Print:
1.
Use the same paper type that you were using when you detected a problem.
2.
Use the
key on the front panel to check that the selected paper type is the same as the paper
type loaded into the printer.
3.
At the printer's front panel, select the Image Quality Maintenance menu icon
, then Print
diagnostic image.
It takes about two minutes to print the Image Diagnostics Print.
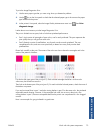
The print is divided into two parts, both of which test printhead performance.
●
Part 1 (top) consists of rectangles of pure colors, one for each printhead. This part represents the
print quality that you will get from each color.
●
Part 2 (bottom) consists of small dashes, one for each nozzle on each printhead. This part
complements the first, and aims more specifically to detect how many faulty nozzles each
printhead has.
Please look carefully at the print. The names of the colors are shown above the rectangles and in the
center of the patterns of dashes.
First look at the upper part of the print (part 1). Each colored rectangle should be a uniform color
without any horizontal lines across it.
Then look at the bottom part of the print (part 2). For each individual colored pattern, check that most of
the dashes are present.
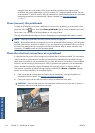
If you see horizontal lines in part 1 and also missing dashes in part 2 for the same color, the printhead
responsible needs cleaning. However, if the rectangles look solid, do not worry about just a few
missing dashes in part 2; these are acceptable because the printer can compensate for a few clogged
nozzles.
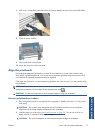
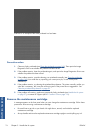
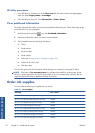
Here is an example of a gray printhead in a good state:
ENWW
Work with ink system components
73
Handle the ink system