


76
Thumbnail displays of clips on the
hard drive
You can also display and manage thumbnails of
the clips stored on the hard drive just as you can
with clips on the P2 cards installed in the unit.
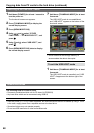
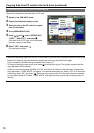
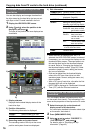
1 Display the HDD EXPLORE screen.
2 Using and , select the partition to be
displayed, and press .
The clips of the partition are now displayed as
thumbnails.
3)
1)
2)
4)
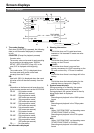
1) Display statuses
Displays the thumbnail display status of the
hard drive clips.
2) Partition information
The following information is displayed.
SERIAL: Serial number of P2 card
MODEL: Model name of P2 card
3) Recording mode and system format
The recording mode of the clip at the cursor
position and system format are displayed.
4) Disk information
NUMBER (NO.):
Partition number (1 to 23)
PARTITION: Type of the hard disk is
displayed. (Page 69)
DATE/TIME:
Partition recording date/time
VERIFY: Setting for verifying during
recording, and verifying results
ON/
FINISHED:
The two sets of data
have been verified
and found to match.
ON/
FAILED:
The two sets of
data have been
verified and found
not to match.
OFF:
The two sets of data
were not verified.
“– –” is displayed in the case
of a P2 store hard drive.
•
NAME: Partition name
When the menu is displayed and “EXIT” is
selected, the HDD EXPLORE screen is restored.
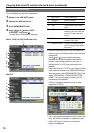
If necessary, you can change the displays on the
thumbnail display screen. The steps taken to do
this are the same as for the thumbnail displays
for cards. Refer to “Changing the displays on
the thumbnail display screen” (Page 38). Other
operations (repair, connect, adding text memo,
etc.) are not available.
Clips can be deleted from the thumbnail display
screen of the FAT type of hard drive, but other
operations (repair, connect, adding text memo, etc.)
are not available.
With a FAT type of hard drive, clips after the first
thousand clips will not be displayed.
DATE/TIME is displayed in Coordinated Universal
Time (UTC) with the P2 store hard drive.
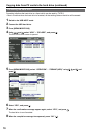
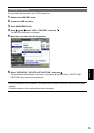
Displaying the clip information on the
hard drive
You can display detailed information about clips
on the screen, and check it. This information is the
same as the properties of the clips on the P2 cards.
1 Select the target clip on the thumbnail
display screen of the hard drive.
You can display detailed information about clips
on the screen, and check it.
2 Press [MENU/MODE CHK].
3 Using , and , select “PROPERTY”–
“CLIP PROPERTY”, and press .
For details, refer to “Displaying the clip
information” (Page 43).
•
•
•
•
•
Copying data from P2 cards to the hard drive (continued)