


Chapter 3: Taking Pictures 27 Taking More Advanced Pictures
Shooting Continuous Images
Note: When the camera is set to the Continuous
image type, you can only take one picture with
the 10-Second Timer or 3-Second Remote timer
modes. Therefore, to capture a Continuous
sequence of images, either use no timer mode
(that is, leave the timer mode set to its default
Off setting), or use the Remote timer mode.
If you are using the:
Shutter release button with no timer mode set
Shutter release button with no timer mode setShutter release button with no timer mode set
Shutter release button with no timer mode set,
press the shutter release button and
continue to hold the button down. The camera then begins to capture the images in the
Continuous sequence.
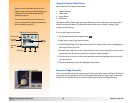
Remote
Remote Remote
Remote timer mode
timer mode timer mode
timer mode, point the HP Remote Control at the camera, and press and
release the Remote Control’s trigger button for each image you want to capture in the
Continuous sequence.
Continuous images are captured until either you release the shutter release button (with no timer
mode set), or you stop pressing the Remote Control’s trigger button (with the Remote timer mode
set), or the memory card becomes full, whichever comes first.
Note: If Instant Review is on, each image in a
Continuous sequence except for the final one is
automatically saved to the memory card before
the camera captures the next image in the
sequence. If Instant Review is off, each image is
automatically saved before the next one is
captured, and then the final one is saved
automatically, as well.
Also note that, unlike Timelapse images,
Continuous images are not grouped together
but are individual images. Thus, they are saved
as individual images on the memory card.
The camera will capture images as fast as it can. The time between pictures will vary depending on
the processing required (for such things as the resolution and image quality settings) before each
image is saved to the memory card (see the second Note on the left). The capture rate also depends
on whether or not the flash is being charged between shots. If you wish to increase the capture rate
of Continuous images, you can turn the live view of Capture mode off by pressing the DISPLAY
button on the back of the camera, turn Instant Review off through the Display menu option in the
Preferences menu of Capture mode (see “Display Submenu” on page 75), and not use the flash.
If Instant Review is on (see “Using Instant Review” on page 33). at the end of taking a Continuous
sequence of images, the final image of the sequence is displayed in the Instant Review on the image
LCD. You can do any of the following during the Instant Review period:
Record sound that will be attached to the final image of the sequence. For information on how
to do this, see “Recording Sound” on page 34.
Delete the final image of the sequence by pressing the middle (Delete) soft key. (All of the
other images in the sequence were already saved to the memory card.)
Note: If you are unhappy with any other
images within a Continuous sequence (rather
than just the final image, which you can only
delete during Instant Review), you can delete
those images in the Review mode. To do this,
see “Deleting Images” on page 40.
Save the final image of the sequence to the memory card and return to the Capture mode
immediately by pressing the right (Exit) soft key. (All of the other images in the sequence were
already saved to the memory card.)
Do nothing and, when Instant Review times out (the default time-out is 3 seconds), the final
image of the sequence is then saved to the memory card automatically.