


Chapter 4: Viewing and Reviewing Images 38 Using Review Mode
Using Review Mode
Accessing the Review Mode
To access the Review mode:
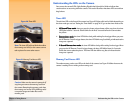
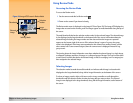
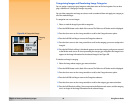
Figure 23: Image LCD Screen in Review Mode 1 Set the camera mode dial to Review mode .
2 Power on the camera if you haven’t already.
The Review mode screen is displayed on the image LCD (see Figure 23). The image LCD displays the
images that are saved on the memory card. The images appear as small thumbnails along the top of
the screen.
The small thumbnail that has the selection marker under it is the selected image. The selected image
is also displayed as the large thumbnail on the bottom left of the screen. Information about the
selected image (including the image number and the date and time the image was captured)
appears on the bottom right of the screen. If the selected image is a part of a group, the group
name is also displayed. If the image was transmitted to this camera from another camera, and the
other camera had a camera name assigned, then the camera name is displayed (instead of any
group name).
The icon bar above the image information area shows whether the selected image is a single image,
a collapsed Timelapse sequence of images, or a collapsed group of images. The icon bar also shows
a sound icon if sound is attached to the selected image, as well as a category icon if a category has
been assigned to the selected image.
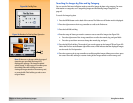
Selecting Images
The selection marker beneath the small thumbnail row indicates which image is selected and is
displayed as the large thumbnail, along with its image information, at the bottom of the screen.
To select an image, press the right or left arrow on the 4-way controller to scroll through the
thumbnails until the selection marker is under the image that you want to select. The selected
image is now displayed as the large thumbnail, along with its image information, at the bottom of
the screen.
Selection
marker
Image
information
Thumbnails
Selected
image
Soft key labels