


Chapter 4: Viewing and Reviewing Images 39 Using Review Mode
Marking and Unmarking Images
You can mark several images so that, when you select an action from the Review mode menus, that
action will apply to all the marked images. For example, you can mark several images and delete
them all at once, instead of having to delete one image at a time.
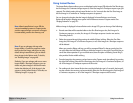
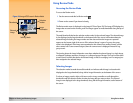
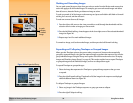
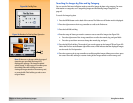
Figure 24: A Marked Image To mark or unmark all of the images on the memory card, press and hold the left (Mark or Unmark)
soft key for 3 seconds, and then release it.
To mark one or more (but not all) images:
1 Press the right or left arrow on the 4-way controller to scroll through the thumbnails until the
selection arrow is under an image you want to mark.
2 Press the left (Mark) soft key. A notch appears in the lower right corner of the selected thumbnail
image (see Figure 24).
3 Repeat steps 1 and 2 to mark additional images.
To unmark an image, scroll to the marked image, and then press the left (Unmark) soft key.
Expanding and Collapsing Timelapse or Grouped Images
When you take Timelapse pictures, the camera takes a sequence of pictures and automatically
groups the captured images, using the first captured image to represent the sequence. You can also
group individual images using the Group menu option of the Review mode menus (see “Grouping
Images and Dissolving Image Groups” on page 41). This section explains how to expand Timelapse
or grouped images into the individual images, and how to collapse them again.
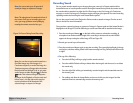
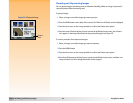
Figure 25: An Expanded Group
To expand Timelapse or grouped images:
1 Select the image that represents the Timelapse or grouped image sequence that you want
to expand.
2 Press the right (Expand) soft key. Thumbnails of all the images in the sequence are displayed
with links between them (see Figure 25).
To collapse Timelapse or grouped images:
1 Select any image in the Timelapse sequence or group you want to collapse.
2 Press the right (Collapse) soft key.
A notch
indicates
a marked
image