USING THE MENU SCREEN AI/BLC•EVAL
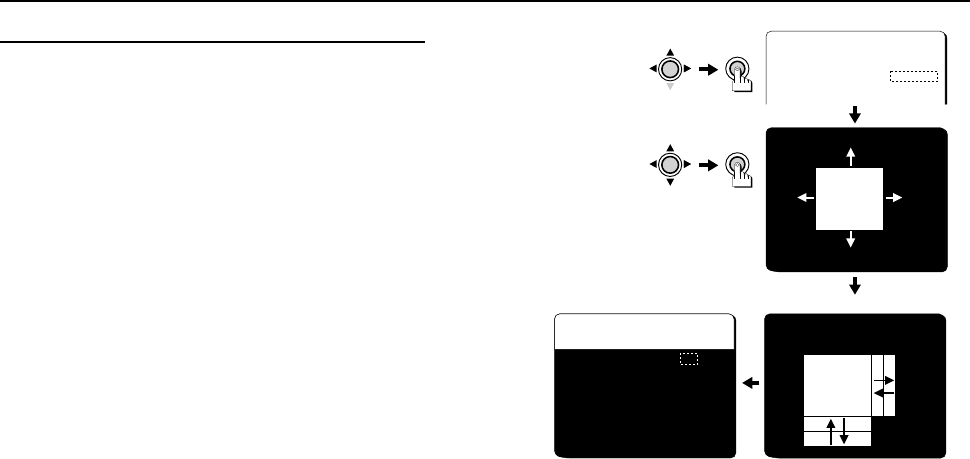
BLC/EVAL (5-section photometry) mode setting
1 Press the CURSOR (j, then d or c) button so that “EVAL” is selected for BLC (the
setting will flash), then press the SET button.
The ADJUSTMENT FOR BLC screen will be displayed, and the photometry mask will also be
displayed in the center of the screen.
2 Press the CURSOR (d, c, j or l) button to move (up, down, right, left) the
photometry area to the desired position, then press the SET button.
The SIZE screen will be displayed.
3 Press the CURSOR (d, c, j or l) button to change the size of the photometry
area, then press the SET button.
The BLC WINDOW WEIGHTING screen will be displayed.
Note: When the OPTION MENU screen ZOOM or MIRROR item is being used (set to ON),
the BLC (MULTI or EVAL) setting screen will not be zoomed in or mirrored.
ADJUSTMENT FOR AI
LENS TYPE DC
BLC EVAL p
SENSE UP OFF
SET
CURSOR
CURSOR
SET
ADJUSTMENT FOR BLC
[POSITION]
ADJUSTMENT FOR BLC
[SIZE]
BLC WINDOW WEIGHTING
TOP 0
BOTTOM 0
LEFT 0
RIGHT 0
CENTER[FIX] 15
PRESET OFF
MENU BACK
L53R4/US GB 1999, 12, 7
English 25
