


140
wPrinting
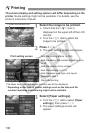
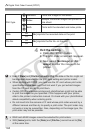
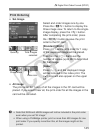
In step 4 on page 138, select the printing
effect. When the <e> icon is displayed
next to <z>, press the <B>
button. You can then adjust the printing
effect. What can be adjusted or what is
displayed will depend on the selection
made in step 4.
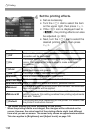
Brightness
The image brightness can be adjusted.
Adjust levels
When you select [Manual], you can change
the histogram’s distribution and adjust the
image’s brightness and contrast.
With the adjust levels screen displayed, press
the <B> button to change the position of
the <s>. Turn the <5> dial to freely adjust
the shadow level (0 - 127) or highlight level
(128 - 255).
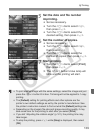
kBrightener
Effective in backlit conditions which can make the subject’s face look
dark. When [On] is set, the face will be brightened for printing.
Red-eye corr.
Effective in flash images where the subject has red eye. When [On]
is set, the red eye will be corrected for printing.
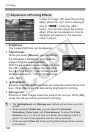
e Adjustment of Printing Effects
The [kBrightener] and [Red-eye corr.] effects will not show up on the
screen.
When you select [Detail set.], you can adjust the [Contrast],
[Saturation], [Color tone], and [Color balance]. To adjust the [Color
balance], use <9>. B is for blue, A is amber, M is magenta, and G is
green. The color in the respective direction will be corrected.
When you select [Clear all], all the printing effect settings will be reverted
to the default.