


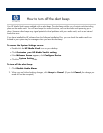

How to set the date and time
To access a Clock Settings:
1.
Double
-
click the
HP Media Vault
icon on your desktop.
2. Click
Customize your HP Media Vault
’
s setting
.
3.
If the
Welcome Screen
appears, click
Configure Device
.
4.
Click the
System Settings
tab.
5. Click
Clock Settings
.
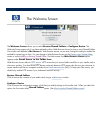
You can make one or more date and time changes on the
Clock Settings
screen.
Synchronizing the date and time
If you have Internet access on your network, the HP Media vault automatically synchronizes its date and time
with an Internet public Network Time Protocol (NTP) server. This synchronization feature called
Automatically
Set Clock from Internet (NTP) Server
is set at the factory. The checkbox for this feature is located in the
upper
-
left corner of the screen.
By default, the media vault connects to the first available NTP Server. Under normal circumstances, you should
not have to modify the addresses of the three pre
-
set NTP Servers.
If you want to set the clock manually, you should clear
Automatically Set Clock from Internet (NTP)
Server
check box.
If you
set the clock manually without clearing this feature, the next time the media vault
checks its time against the NTP sever, the NTP Server will change your manual settings.
Setting the clock manually
1.
Enter the appropriate
Year
,
Month
, and
Day
.
2.
Enter the
Hours
,
Minutes
, and
Seconds
.
3.
If you have set the
Time Display Format
to use a 12 Hour Clock, click either
AM
or
PM
. (See the
second bullet
item in Other clock settings below.)
4. Click
Set Clock Manually
.
Other clock settings
If you do not want your media vault to automatically adjust for Daylight Saving Time, click the
Automatically
Adjust Clock for Daylight Savings Time
checkbox to clear it. If you live in a daylight
-
savings time zone,
and keep this box selected, your media vault will automatically update its clock for the Spring and Autumn time
changes.